
 All blog posts
Labelbox•April 16, 2019
Labelbox Adapts to Support American Family Insurance Automation

At Labelbox we believe that encoding business logic into the ontology of your data labeling is paramount for a successful machine learning operation. The majority of machine learning efforts are delayed by the same problem - building the infrastructures to support it, which is expensive and distracting. Our solution is to standardize collaborative machine learning workflows in an intuitive, scalable, and customizable framework. By abstracting complexity from industry and business specific problems, we’ve developed an out-of-the-box infrastructure for data labeling, quality testing, and improving model accuracy.
Why Did We Decide to Work With American Family Insurance?
Elegance in Logical Simplicity
We design for trainability and transferability. Building infrastructure that breaks complexity down to its core logical components optimizes for learning, reuse, and adaption. It takes expert engineering and creative product design to build advanced features that are elegantly simple. We streamline machine learning pipelines by stripping them down to their essentials. But instead of merely telling you how our design principals set us apart, we are going to show you an example that illustrates our product development process.
Engineering Partnership
We help businesses achieve world-class machine learning objectives by deriving innovation from their labeling ontology. Our product roadmap is built from extensive market research. Machine learning is a fast-paced industry and we rigorously innovate in response to its most pressing issues.
American Family Insurance, a Fortune 400 company, is using Labelbox to help them implement machine learning to automate insurance claims. To help American Family achieve its goals, we built a nested classification feature. In order to train their models, it wanted to develop a nested ontology that our interface did not yet support. We want to share why and how we built this new product feature because it shows that we are not just software, but an engineering partnership.
As a startup with top software engineering talent, we have the means and desire to adapt the product to fit the needs of our customers. Businesses are starting to disrupt industries with machine learning applications and we are committed to making that disruption possible. In this article, we will walk through the feature we built to help support American Family's use case.
American Family Insurance Use Case
Let’s first start with a high-level overview of what American Family was trying to accomplish. They wanted an ontology that grouped things under higher level categories. Our interface at the time allowed for only one level of nesting. The interface could be configured so that a labeler would be prompted to answer some questions about the image they had just segmented. This can be seen in our example project.
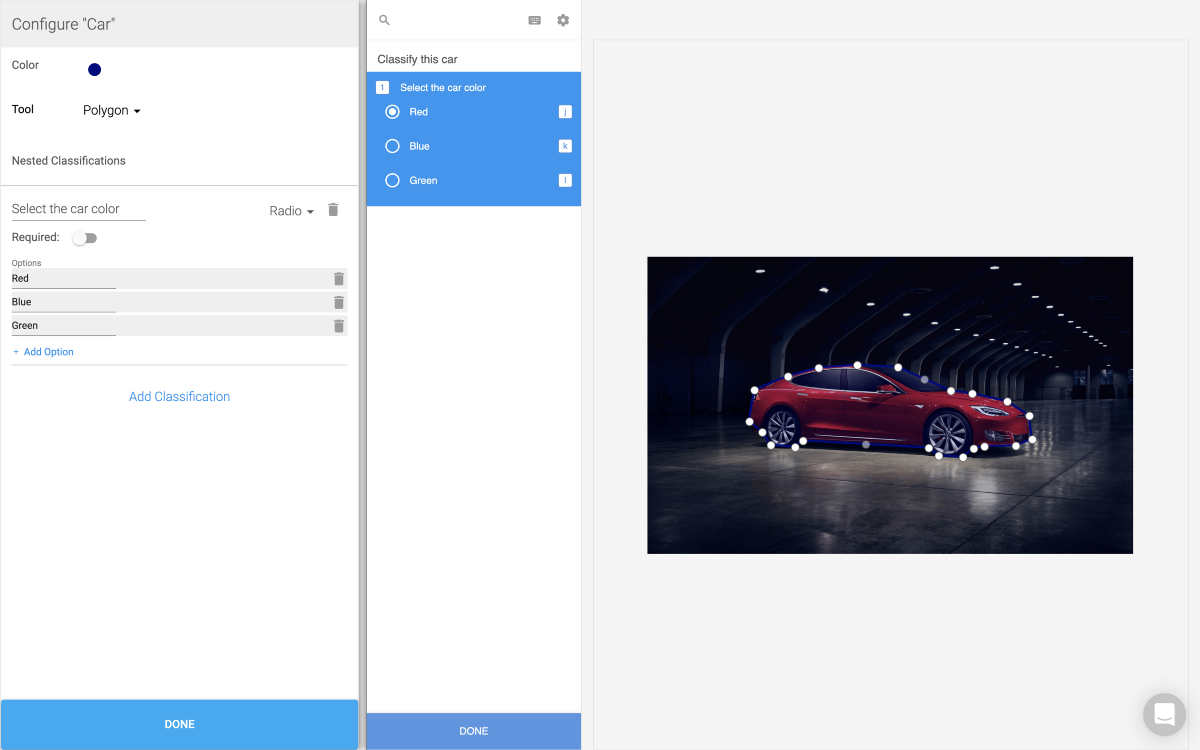
Now would be a great time for you to check out our interface and play around with the example project: app.labelbox.com. Our interface is composed of two parts. The configurator allows an admin to come in and define an ontology. This ontology is then used to define all of the tools and classifications a labeler will have access to when they begin labeling the project in our image segmentation interface.
It is important to get the ontology right because it determines in advance what the labeler will be able to label which in turn determines the categories the model will be able to identify.
We already offered a single layer of nesting. As you can see on the car interface, it was possible to segment an image and then make a classification about the specific segmentation.
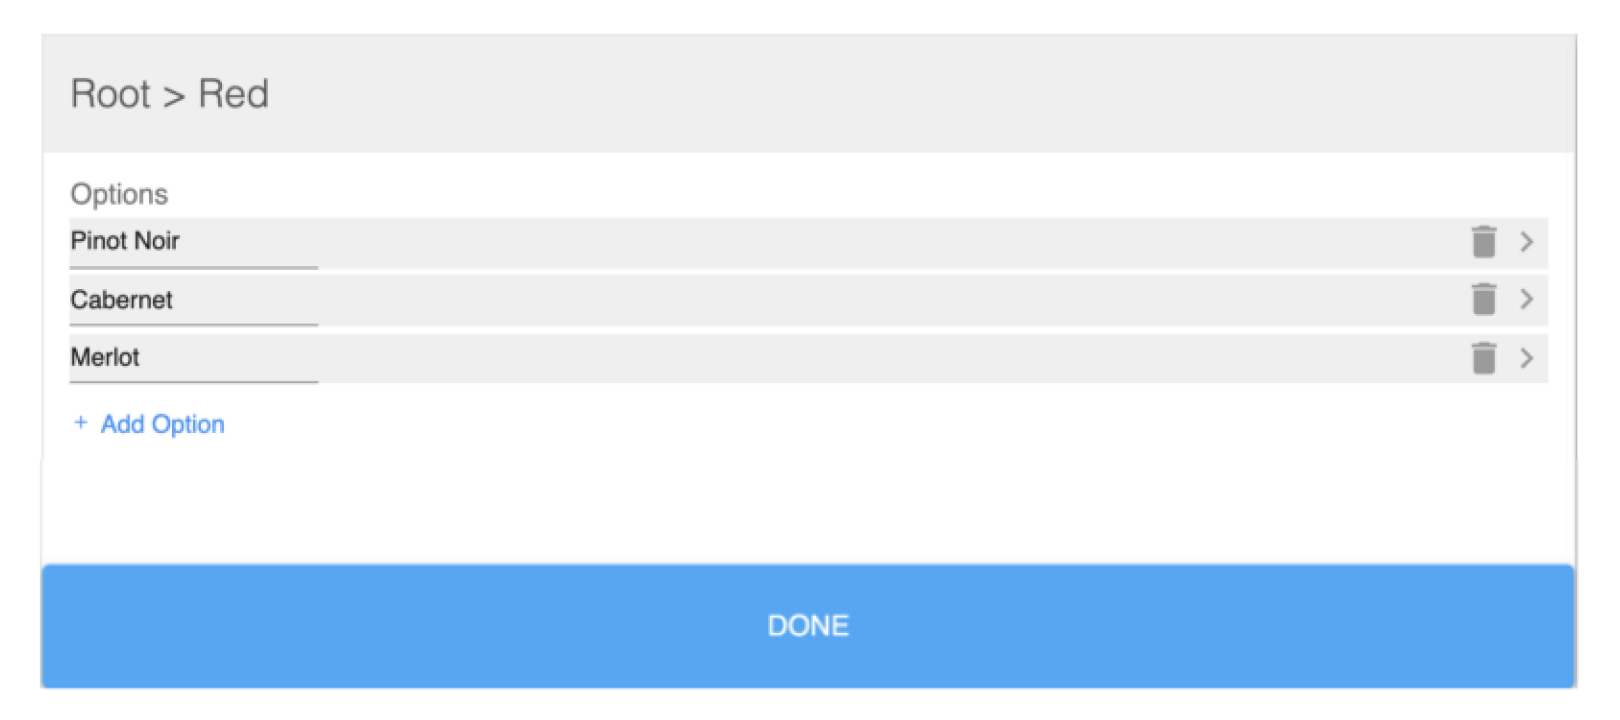
American Family wanted the ability to nest categories to an arbitrary depth. For example, we all learn in biology about The Linnaean Taxonomy (Kingdom, Phylum, Class, Order, Family, Genus, Species). By breaking the natural world into these hierarchical categories, scientists are able to classify any living creature. American Family wanted to train its models with a similar taxonomical structure. In order to help achieve this goal, we created a nested dropdown interface.
The nested dropdown allows an admin to define any taxonomical structure by allowing them to nest items to an arbitrary depth. This gives an administrator maximal flexibility for defining the hierarchy of their data.
Building the Feature
Now that you understand the motivation for the feature, we're going to walk you through how we built it. It’s important to differentiate the two different steps of making a label. The first step is configuring an interface using our configurator. The admin responsible for setting up the project can pick from various different tool types for doing image segmentation as well as different classifications that can either be about the image as a whole or applied to individual segmentations.
By defining the interface the admin chooses in advance what tools and classifications the labelers will have access to.
The next step is the actual interface a labeler will see when going to segment/classify images. Try building your own interface as you follow along at app.labelbox.com. This will give you a more complete understanding of what the tool is capable of.
In order to avoid constantly referencing gists, we’ve made a codesandbox with a simplified version of our interface. It just includes the dropdown feature, so keep in mind that this is only one of many tools that users have access to in Labelbox.
App.tsx
We use React with Typescript at Labelbox, so you will notice that all of our frontend files have the .tsx file extension. If you are familiar with javascript and react, you should have no problem following along. The syntax is almost identical as typescript is just a superset of javascript (providing compile time type checking).
Let’s take a quick look at App before we move on to its component pieces. App is going to manage our state and pass everything else down via props. If we take a look at defaultState.ts we can see the shape we expect our state to have.
The classification field is a representation of our classification interface. Here we are hard-coding the type as dropdown, but in our full interface this could be a list of radio buttons, checkboxes, or text classification (which allows users to type in responses).
The really important field for our demonstration today is the options field. Because the purpose of our dropdown interface is to allow nesting to arbitrary depth, options very naturally gives itself to being represented as a tree. Each option has a label and a value and an optional options field which can contain its children.
Looking at our default state, we can see the shape we are using to model this data. If we look at the leaf nodes, we’ll notice that their options array is empty. This is because we haven’t configured them to have any children, but there is no need to limit the interface to this depth. We could keep on adding new children for as many layers as we needed to satisfy the classification of the images we are labeling.
Now that we have an idea of what our state looks like, let’s take a look at the interface we’ve built to allow an admin on the American Family team to create a nested ontology.
You’ll notice that our App component is rendering two components: Dropdown and Classification. Dropdown is the dropdown implementation of our configurator. Classification is the classification implementation for our image segmentation interface.
These components are just two sides of the same coin. The left side of the interface you see in the playground is what we call the configurator and is composed of the Dropdown component. This is where an admin will define an ontology for their labelers. The right side is what we call our image segmentation interface and is composed of the Classification component. This is what a labeler will have access to while segmenting and classifying an image.
Configurator
The configurator is where an admin first defines an ontology for their labelers. We store this data in a schematized format that allows us to keep track of changes team managers make to their ontology over time, but for simplicity we are just going to use JSON.
The purpose of the configurator is to create a piece of JSON that can be consumed by our image-segmentation interface in order to create the UI for image labeling. The src/app directory contains all of the code for the configurator.
Before diving into the code, it’s important we understand the high-level conceptual model of how we will be navigating these dropdowns. Any given node in the tree of dropdowns has the exact same UI.
The UI is a single view that has a title bar with the path to the currently selected dropdown and displays its children. Because of this, we can use the path we have taken to get to the current node to determine which node we should render. As you can see on App's state, there is a property called dropdownPath. We use this array to store indices of which child node was selected at each level as we traversed deeper and deeper. Likewise, as we traverse back up the tree (by hitting the blue DONE button), we will simply pop indices off of the array.
Now that we have a high-level understanding of how we’re modeling the data, let’s take a look at a few of the key functions that make the interface work. In dropdown-helpers you will find three functions. We will be taking a look at removeDropdown:
This is the function used when deleting a dropdown by clicking the trashcan icon. Let’s take a look at how it works.
It is a recursive function that has two responsibilities:
1. Traverse the options tree to the node currently being rendered
2. Remove the option specified by the `indexToRemove` parameter
The removal of our node happens in our base case (lines 6–11). We slice the options to pull out the option at indexToRemove.
The rest of our function is responsible for our traversal logic. As I mentioned before, we store the path to the currently rendered node as an array of numbers. At every step, we want to traverse down the node at path[0]. We store this in optionToTraverse. The rest of the logic is very similar to our base case, except instead of removing the option we want to pass down a function that allows it to remove one of its descendants.
Image-Segmentation/Classification
As was said before, the image-segmentation interface consumes the JSON we just updated. I leave it as an exercise for the reader to figure out how this all works in the interactive playground. All of the code relevant to the image segmentation part of the interface can be found in src/image-segmentation. Use Classification as your entry point and trace the props down from App.
Conclusion
As you can see, we go above and beyond to make our customers successful in training production-ready machine learning models. Why waste time and resources building your labeling ontology from the ground up instead of focusing on your core business proposition? To get a numerical estimation of how much time and money you would save using Labelbox as opposed to building an in-house version, fill out our Build vs. Buy Calculator.
Get Started With Labelbox
Visit www.labelbox.com and sign up to test out the free version of our product and or speak to one of our team members about an enterprise solution for your business.


