All guides
Working with videos using Gemini 1.5 and multimodal models

Introduction
Given the pace of innovation in AI, teams are continually looking to integrate various data types like text, images, and video as a way to unlock new functionality for delivering next-gen applications and experiences. The development of multimodal models, which can process and understand diverse data inputs, is one of the most promising advancements.
Notably, combining video processing with the capabilities of large language models (LLMs) is a breakthrough feature for teams who want to highlight specific objects, scenes, and actions from high-volumes of video content.
However, many multimodal models, such as Gemini 1.5, require teams to convert videos to 1 frame per second (FPY) for analysis. Converting FPS, while tedious, aligns the video data with the model’s optimal processing capabilities, ensuring that no critical information is lost while maintaining compatibility with the model’s precision.
In this blog post, we’ll show how easy it is to convert videos to 1FPS and upload them to Labelbox Catalog for generating predictions in Model Foundry.
Preparing videos for inference with multimodal models
The two main approaches for ensuring videos meet the exact 1FPS requirements of multimodal models like Gemini 1.5 include:
- Video Upload: Converting a video to 1 FPS and uploading this converted video into Labelbox Catalog.
- Frame Extraction Upload: Converting a video to 1 FPS, extracting each of the video frames, and uploading the extracted video frame images to Catalog.
By doing so, users will be able to use various multimodal models like GPT- 4v, Claude 3 Opus and Amazon Rekognition (as well as additional models natively supported by Labelbox). It is important to note that 1FPS is not necessary for Model Foundry’s use on video datarows, but this approach may be helpful when using certain multimodal models.
Approach #1 - Upload a 1 FPS Video to Catalog
The first approach is converting a video to 1 frame per second (FPS) and uploading the converted video to Catalog.
You can follow along in this Google Colab Notebook.
Steps
Step 1: Download Video From Google Cloud Storage (GCS)

- The function ‘convert_video_to_1fps_and_download’ is defined to handle the video conversion and upload process.
- It starts by downloading the specified video file from a Google Cloud Storage bucket to the local Colab environment.
Step 2: Convert the Video to 1 FPS

- Using the ‘ffmpeg’ tool, the video is converted to 1 frame per second (FPS). This step is crucial and can be easily modified to change the FPS by altering the ‘-vf fps=1’ parameter in the ‘subprocess.run’ command. For example, to convert the video to 2 FPS, you would change ‘fps=1’ to ‘fps =2.
Step 3: Upload the Converted Video Back to GCS

- After conversion, the video is saved locally and then uploaded back to the GCS bucket.
Step 4: Upload to Catalog
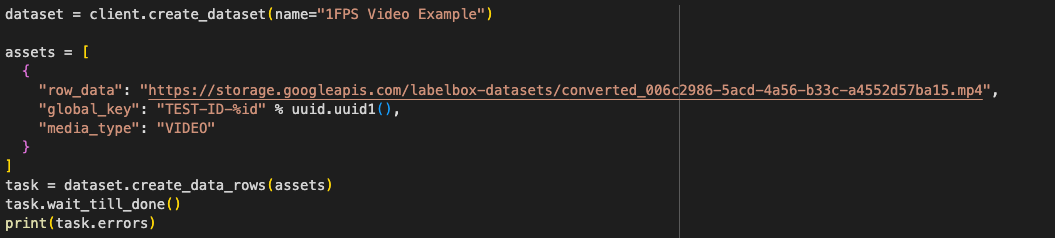
- The converted video is then integrated with Labelbox by creating a dataset and adding the video as a data row.
- The code uses the Labelbox SDK to create a dataset and upload the converted video, making it ready for further processing and labeling in Labelbox.
Approach #2 - Upload Extracted Video Frames to Catalog
The second approach is converting a video to 1 frame per second (FPS), extracting video frames, and uploading the extracted video frame images to Catalog.
You can follow along in this Google Colab Notebook.
Steps
Step 1: Download Video From Google Cloud Storage (GCS)

- The function ‘process_video_from_gcs’ is designed to handle the entire workflow of downloading the video, extracting frames, and uploading them back to GCS.
- It downloads the specified video file from a GCS bucket to the local Colab environment.
Step 2: Extract Video Frames at 1 FPS

- The frames are saved locally in a specified directory.
- Using the ‘ffmpeg’ tool, the video is processed to extract frames at 1 frame per second. Again, this can be easily adjusted by changing the ‘-vf fps=1’ parameter in the ‘subprocess.run’ command to any desired frame rate.
Step 3: Rename and Organize Frames
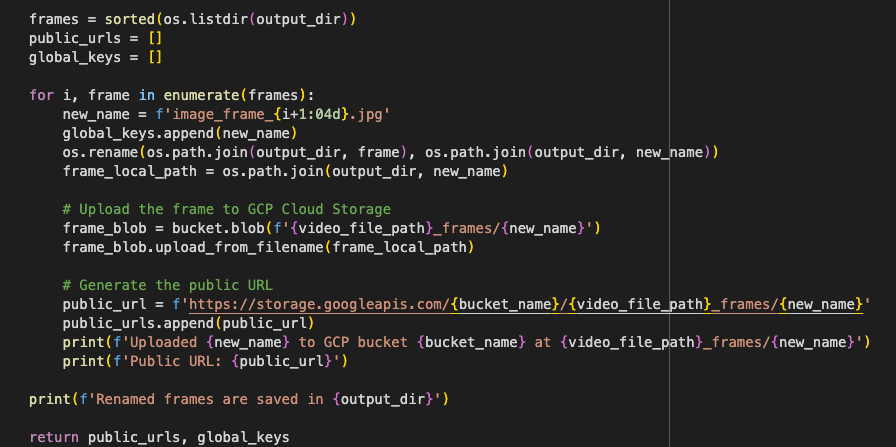
- Each extracted frame is renamed sequentially for better organization, using a consistent naming pattern (e.g. ‘image_frame_0001.jpg’).
Step 4: Upload Frames to GCS
- The renamed frames are uploaded back to the GCS bucket into a directory specific to the frames of the video.
- Public URLs and global keys for each uploaded frame are generated and stored for later use.
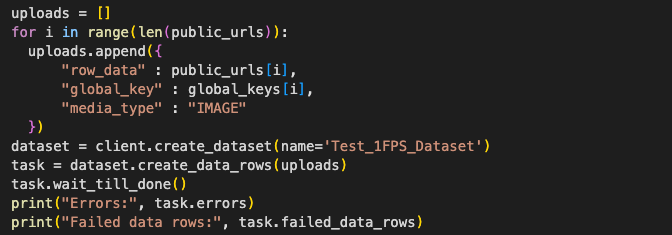
Step 5: Upload to Catalog
- The extracted frames are uploaded to Catalog by creating a dataset and adding each frame as an individual data row, using the Labelbox SDK.
Additional Considerations
When deciding between uploading 1FPS videos or extracted video frames to Catalog, there are some important features to consider:
For 1FPS Videos

- Temporal Context Preservation:
- Provides a continuous video stream and maintains the temporal relationships and sequences between frames
- Simplified Workflow:
- Managing a single video file is typically simpler than handling multiple image files, reducing the number of files to manage
- Limited Flexibility in Frame Manipulation:
- Videos offer less flexibility for individual frame manipulation and augmentation compared to separate image files
- Videos offer less flexibility for individual frame manipulation and augmentation compared to separate image files
For Extracted Video Frames

- Increased Optionality:
- Process only frames that are most relevant, allowing for greater control over the dataset
- Extracted frames can be pre-processed or filtered according to specific criteria, potentially enhancing the quality of input data
- Focus the analysis on the most important moments in the video
- Loss of Temporal Context:
- Individual frames lack the temporal continuity present in videos, which might be crucial based on the specific use case.
- Increased File Management:
- Handling a large number of individual image files within Labelbox Catalog
Next steps
Once a video dataset has been converted to 1FPS via one of the two approaches highlighted above, Gemini 1.5 and other multimodal models can be used to harness AI for efficient video labeling, enabling precise and accurate frame classification to enhance data insights and model training.
Conclusion
In this blog post, we explored the importance of preparing video data for multimodal models like Gemini 1.5, which analyze video data at 1 frame per second (FPS). This ensures maximum compatibility with the model's processing capabilities for accurate and efficient analysis.
Choosing between uploading 1 FPS videos and extracted video frames depends on your project's specific needs. As a rule of thumb, uploading videos preserves temporal context and simplifies file management, while extracting frames allows for detailed analysis and greater control, but with more file handling.
By understanding these considerations, you can effectively leverage multimodal models like Gemini 1.5, optimizing your workflow for enhanced performance and accuracy in video classification tasks.
If you are not already using Labelbox, you can get started for free or contact us to learn more about using multimodal models for better video classification.