All blog posts
Labelbox•July 30, 2019
Managing a Labeling Team and Building a High-Impact Deep Learning Model for Tree Identification
By Leo Sanchez
Leo is a native Brazilian from Rio de Janeiro. He is a mechanical aeronautics engineer who currently works as a data scientist and management consultant in Brazil helping several companies to achieve better business results.
This post originally appeared on the Omdena blog.
I participated in an amazing AI challenge through Omdena’s community where we built a classification model for trees to prevent fires and save lives using satellite imagery. Omdena brings together AI enthusiasts from around the world to address real-world challenges through AI models.
My primary responsibility was to manage the labeling task team. Afterward, I had the chance to take on another responsibility and build an AI model that delivered results beyond expectations.
I am Leo from Rio de Janeiro, Brazil and I’m a mechanical aeronautics engineer who currently works as a data scientist and management consultant in Brazil helping several companies to achieve better business results. I also study a lot of deep learning, machine learning, and reinforcement learning to increase my toolbox and problem-solving skills when targeting relevant business and social problems.
My Learning Path at Omdena
When entering the AI Challenge, I found myself with 40 top-talent people from all over the world; I was the only Portuguese speaker in this huge team, but we all shared in the common wish to learn and to contribute somehow.
I was put in charge of managing around 15 members of our great team in the labeling task. Quite frankly, I have never done a label in my life before, so it was challenging right from the start.

I also had the desire to contribute significantly to our AI model during this project; however, I had some doubts considering the talented group and my lack of previous computer vision experience. Could I make a difference?
Labeling and Managing the Team

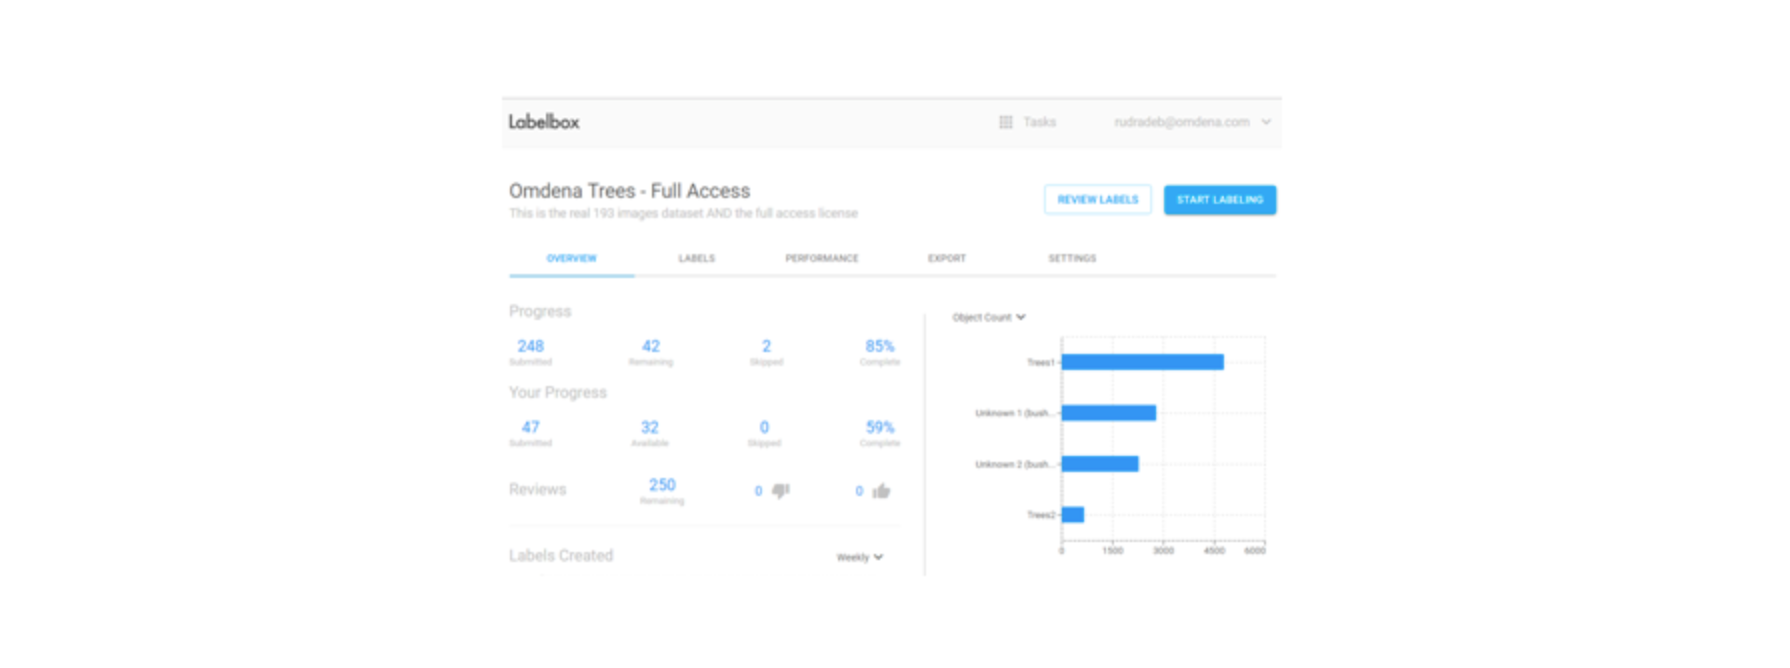
The team began to discuss and test a few options for the labeling task before we quickly settled on Labelbox.
Great tool! Easy to label, easy to manage work, and easy to export labels.
We started with several free accounts what made it harder to concatenate our efforts and manage overall progress. I got in contact with Labelbox with our dilemma and they gave us a free license for educational purposes to support our AI for Good mission. With their help we could now concentrate all members, accounts, and images in just one single account.
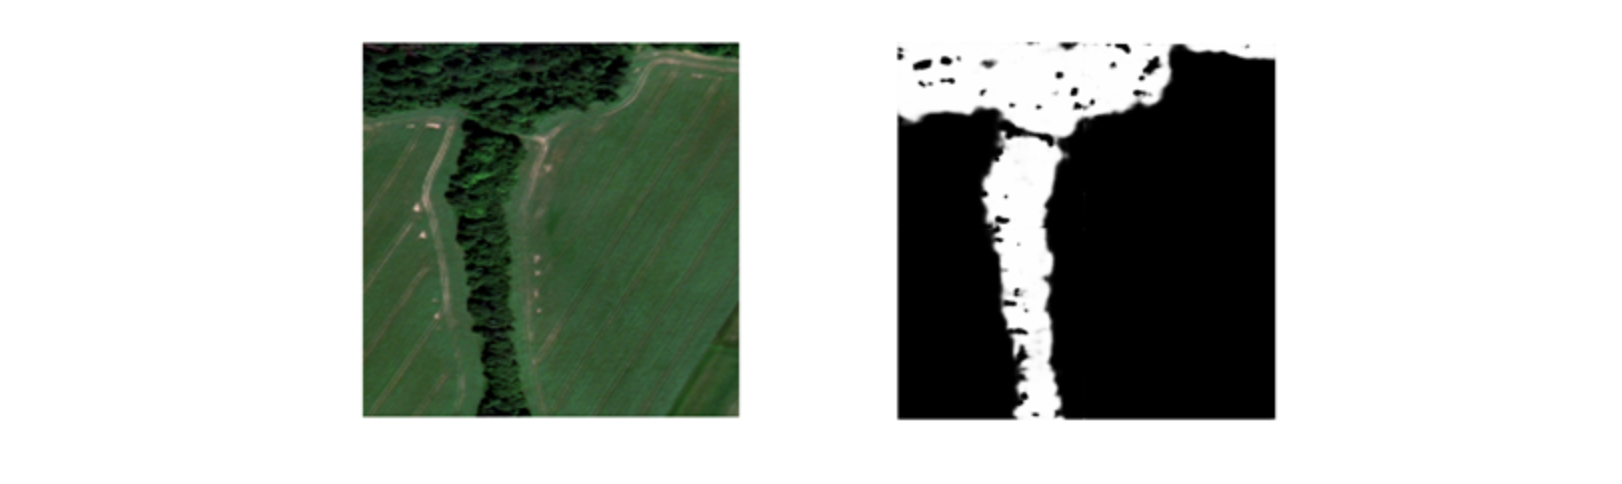
Labelbox has many different annotation tools to label images.e chose to work only with polygons and boxes, and for most of the time just polygons. This way we could make the annotations as tight as possible to trees on our asset images. For spread out and isolated trees we could use the boxes.
Also important was to define certain criteria such as to try to use the “lines” that separate shadows and trees to define the boundaries of the polygons as much as possible. Our hypothesis at this time was that feeding these to the neural networks would help them create powerful features on these. This proved to be right when we managed to train neural networks that clearly separated shadows even among dense forests.
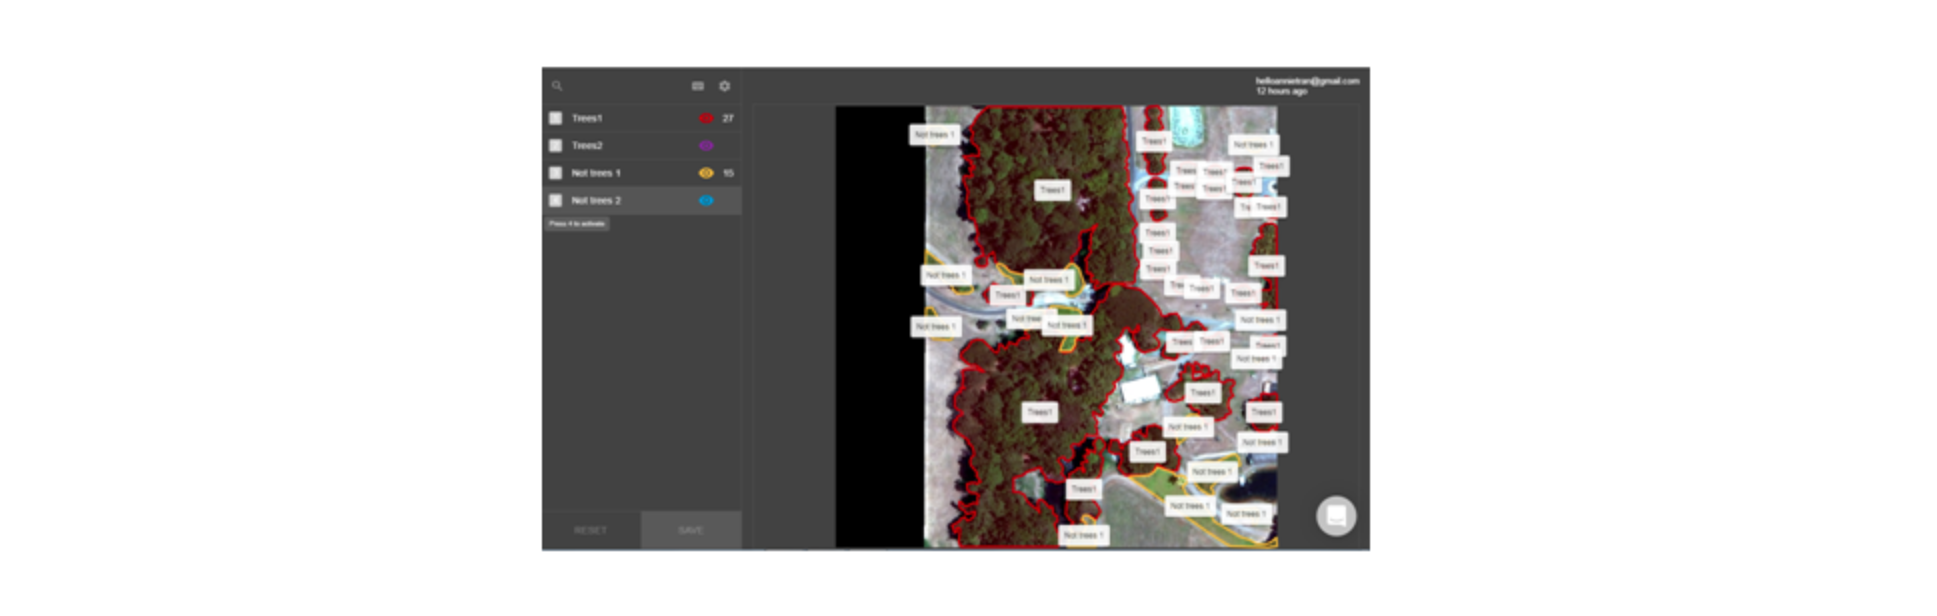
Also, it was important to label standalone trees as many of them could be near power lines in real life. We also managed to differentiate bushes and other very small trees from tall trees by their shadows size and treetop sizes. And lastly, we found zooming into images to label them was very important as we were aiming to have great accuracy.
The Dataset
We had an Australian dataset with around 200 original images to be labeled that contained many different landscapes: some arid, some forests, some urban landscapes, farms…a very diversified dataset.

Labelbox creates a queue with images and distributes them to be labeled by the team. It is possible to easily manage the overall labeling effort and progress by image, by team member, time spent, images labeled, etc. It is also possible to review work done and check quality by accepting or re-enqueuing images that were not labeled as required.
This way we managed to label all images successfully in only a few weeks. The work done has proved later to be extremely valuable as we did train really accurate neural networks to identify trees on completely new and unseen images.
Building a Great Deep Learning Solution
The labeling process consumed 5 or 6 weeks of our time. In the last 3 weeks of the challenge, I had the chance to engage in modeling but at this moment I had serious doubts if I could make any difference for Spacept, which was the startup hosting the problem, Omdena, and my team.
Not Giving Up
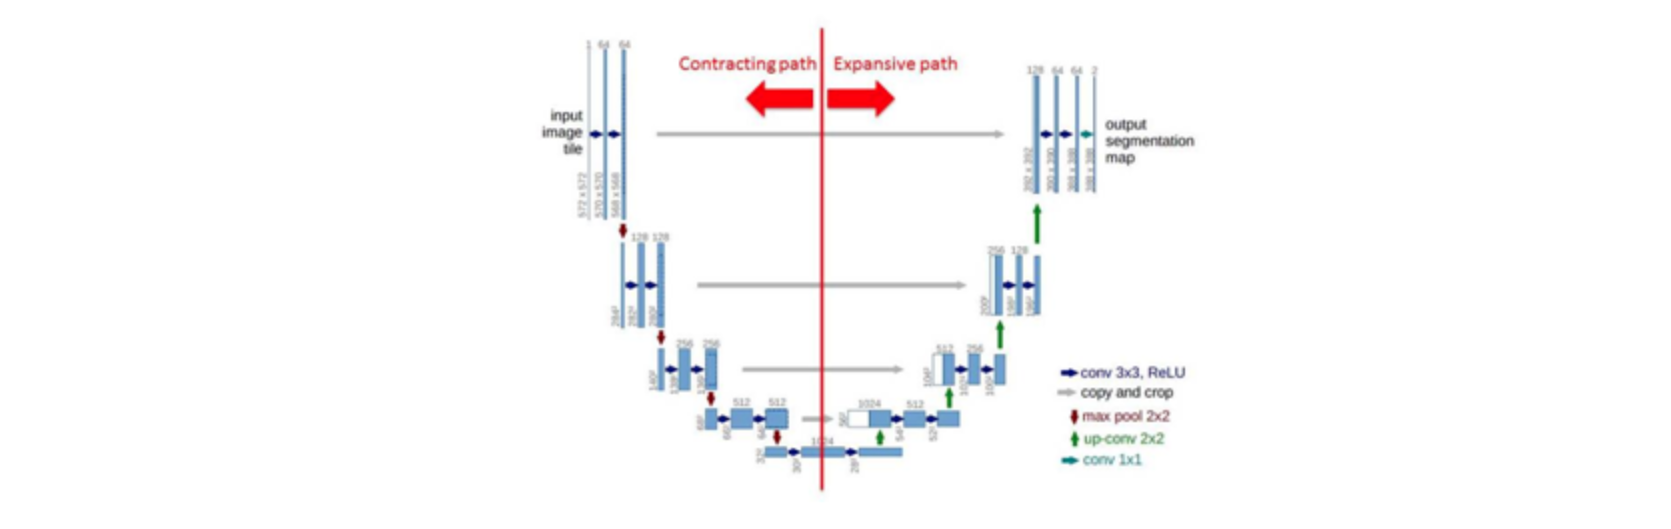
The team I joined was the U-Net team. U-Net is a convolutional neural network that was developed for biomedical segmentation. The network is based on the fully convolutional network first proposed by Long and Shelhamer.
The U-Net consists of a contracting path and an expansive path, which gives it the u-shaped format. The contracting path is a typical convolutional network that consists of repeated application of convolutions, each followed by a rectified linear unit (ReLU) and a max-pooling operation. During contraction, spatial information is reduced while feature information is increased, or in other words, the network is generating features while losing context of where they are in the images. The expansive path combines the features created and spatial information through a sequence of up-convolutions and concatenations with high-resolution features from the contracting path giving to the features created the exact context of where they are in the images.
At this point, the model’s accuracies were suffering mostly because it was hard to teach the neural networks that the greens on images were not all trees, and also because many tree parts were not being identified as trees. My team was willing to investigate U-Net variations such as Nested U-Nets, Bayesian U-Nets, MultiRes U-Nets, Deep U-Nets, and others.
I took the responsibility of investigating these variations, reading all the different papers, searching for a solution that could help to improve results. Many of them seemed very challenging to implement in a short period of time.
One of the techniques called my attention: the Deep U-Net. The DeepUnet paper approaches the sea-land segmentation problem which I thought was a very similar problem to the identification of the trees and indeed they obtained better results than traditional U-Nets for high resolution sensing imagery. Before the deep learning approach NDWI (Normalized Difference Water Index) had been used for the sea-land segmentation problem, similarly as our NDVI (Normalized Difference Vegetation Index) was being used by Spacept. The Deep U-Net seemed a promising path.
Similar to U-Nets, Deep U-Nets have both sides (contraction and expansion side) but uses U-connections to pass high-resolution features from the contraction side to the upsampled outputs. In addition, it uses Plus connections to better extract information with less loss error.
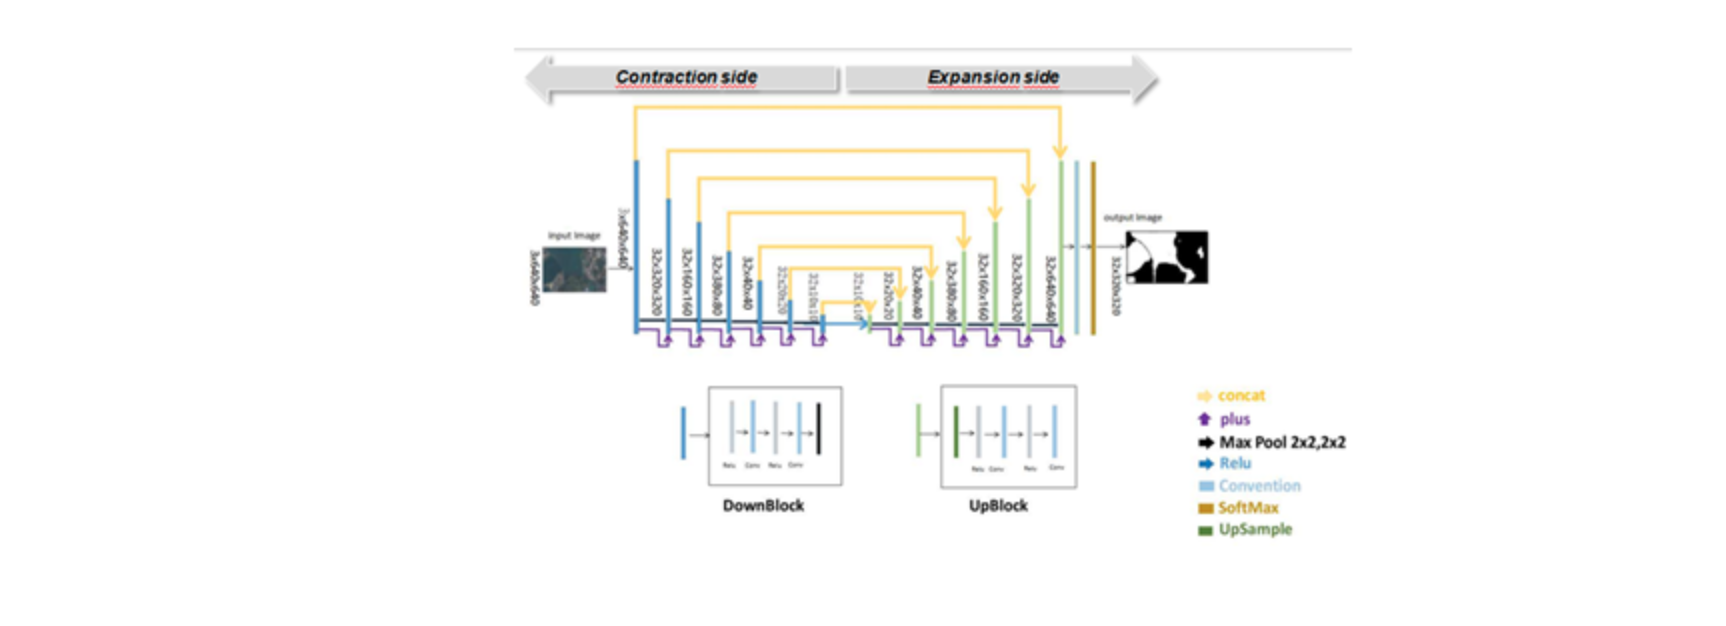
Downblocks and Upblocks function as skip connections to help decrease the training error due to the quantity of layers and help to address any vanishing/exploding gradients issues that can occur in deeper networks.
Having discussed the architecture, a basic Deep U-Net solution was applied to the unique 144 images labeled that were then divided into 119 images and 119 masks for the training set, 22 images and 22 masks for validation set, and 3 images and 3 masks for a test set. As images and masks were in 1,000 x 1,000 images, they were cropped into 512 x 512 images generating 476 images and 476 masks for the training set, 88 images and 88 masks for the validation set, and 12 images and 12 masks for the test set. Applying the Deep U-Net model with 10 epochs and a batch size equal to 4, the results for the 10 epochs—using Adam optimizer, a binary-cross-entropy loss and running over a GPU Geforce GTX 1060—were quite encouraging, reaching 94% accuracy over validation.
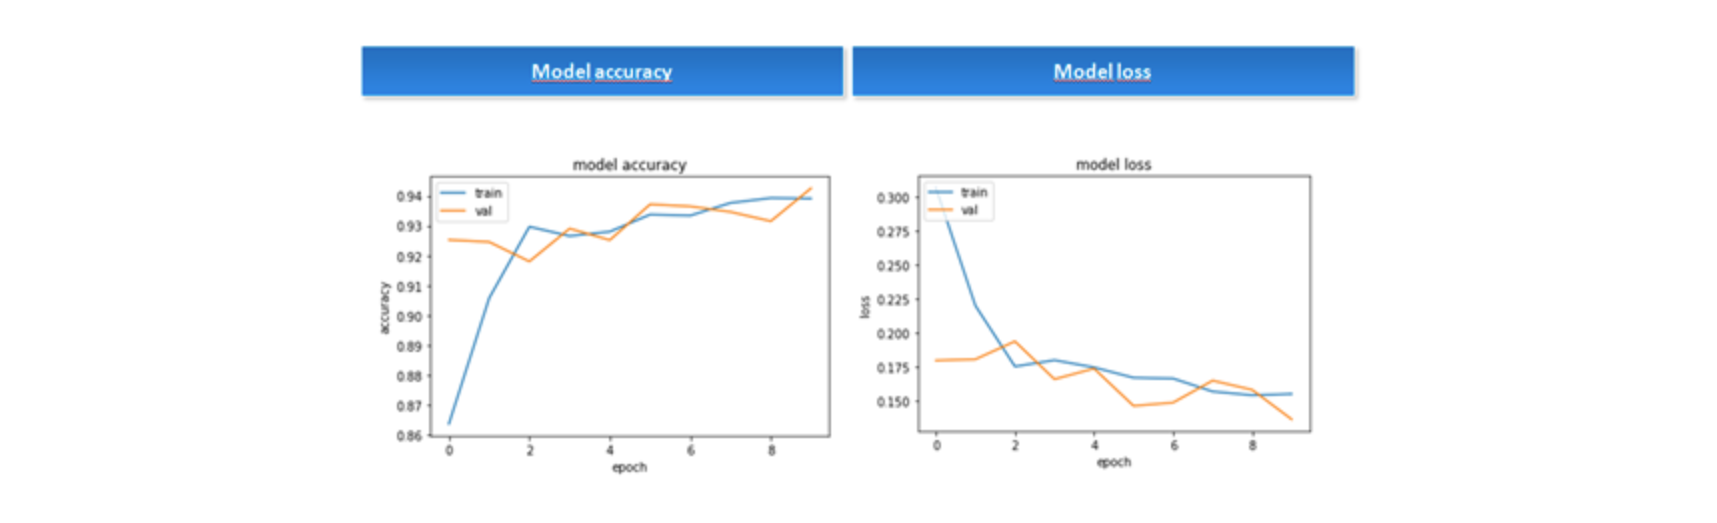
Model Accuracy and loss
Believing that accuracy could be improved a bit further, the basic solution was expanded using data augmentation. We generated through rotations, 8 augmented images per original image and had 3,808 images and 3,808 masks for the training set, and 704 images and 704 masks for the validation set. We reproduced the previous model, keeping the basal learning rate as 0.001 but adjusting with a decay inversely proportional to the number of epochs and increasing the number of epochs to 100.
Doing this we could generate an even better model than the basic solution, reaching 95% accuracy.
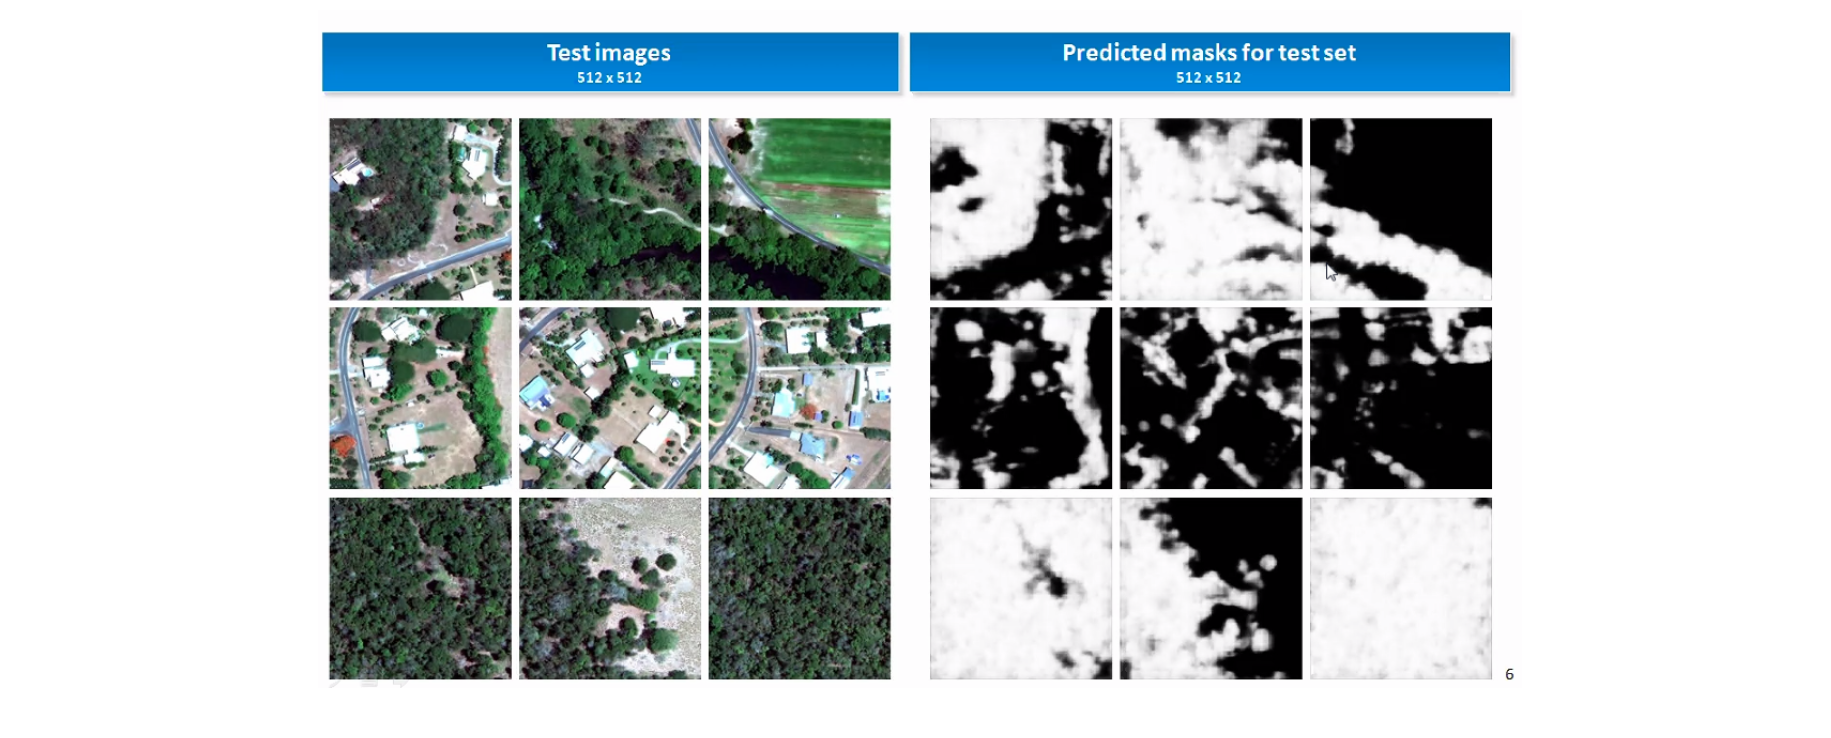
The Deep U-Net model learned very well to distinguish trees in new images, even separating shadows among forests as not trees, reproducing what we humans did during the labeling process but with an even better performance.
A few results can be seen above and were generated using new images completely unseen before by the Deep U-Net.
My Experience Being Part of This Challenge
I just learned a lot!!
I think that being hands-on is the best approach to learning. Getting out of the comfort zone, I learned to implement a computer vision project end-to-end . The Challenge not only allowed me to cover the labeling effort, its management, passing through GitHub, and working as an applied data scientist (that identifies solutions in papers, reads them and applies them), but also the implementation, sharing and discussing the code, running code on AWS instances, and at last putting it in production.
It was an awesome opportunity to get to know and to connect with great people :PhDs, startup entrepreneurs, highly skilled data scientists from all over the world, great data engineers, and top-talent ML engineers.
People working together as a team make all the difference! here is no solo, “walking alone” challenge that can replace that.
Besides achieving these great results, I developed an extraordinary sense of purpose by being of help to an awesome and high tech Swedish company where my efforts can help to avoid fires and outages, potentially saving lives and increasing people's quality of life It is something truly special.
There are only a few opportunities where you can have all of these combined.

At last, because of this incredible experience and all the awesome people I met at Omdena, I was rewarded with an invitation to be Brazil's ambassador for Omdena. I will represent Omdena to help build the Brazilian data science community and to help find social challenges in Brazil that could be solved by our global AI Omdena family. It’s a new and exciting challenge that motivates me to just keep walking ahead!
Just work hard, believe in yourself, count on friendly and skilled people, and do your best. The results will come!

If you want to receive updates on Omdena AI Challenges, get expert interviews, and practical tips to boost your AI skills, subscribe to Omdena's monthly newsletter.