
 All blog posts
Jay Patel•June 20, 2023
Accelerate image segmentation with a new AI-powered solution
This is the third post in a blog series showcasing how Model Foundry brings the power of foundation models into Labelbox. Jay Patel, Senior PM for Computer Vision, writes about how newer models like Meta’s Segment Anything enable faster labeling on Labelbox.
Overview
Labelbox supports a wide variety of computer vision use cases, and continually upgrades itself to help computer vision teams label faster, make sense of their millions of data points, and improve their models. With the upcoming Model Foundry and the latest improvements to the image editor in Annotate, teams can now accelerate image segmentation labeling, leading to a significant reduction in labeling time and cost.
Image segmentation is one of the most popular annotation types, where a user draws a pixel-based mask around an object of interest and subsequently trains a model to predict which class belongs to pixels in the image. Machine learning teams have traditionally relied on manual methods — such as painstakingly tracing object outlines with a pen tool — to label data for training semantic segmentation models. Not only can segmentation masks be time-consuming, but also increases the risk of human-errors that can adversely affect model performance. Image segmentation can be a laborious and error-prone task, with the associated cost and time spent labeling increasing exponentially with more data.
How to leverage Model Foundry for computer vision
Foundation models have the capability to accelerate data labeling and enrichment for key machine learning tasks and are fueling breakthroughs across the field of computer vision. Models such as Meta AI’s Segment Anything Foundation Model (SAM), trained on 1 million images and 1.1 billion masks, are capable of strong zero-shot performance on a variety of objects.
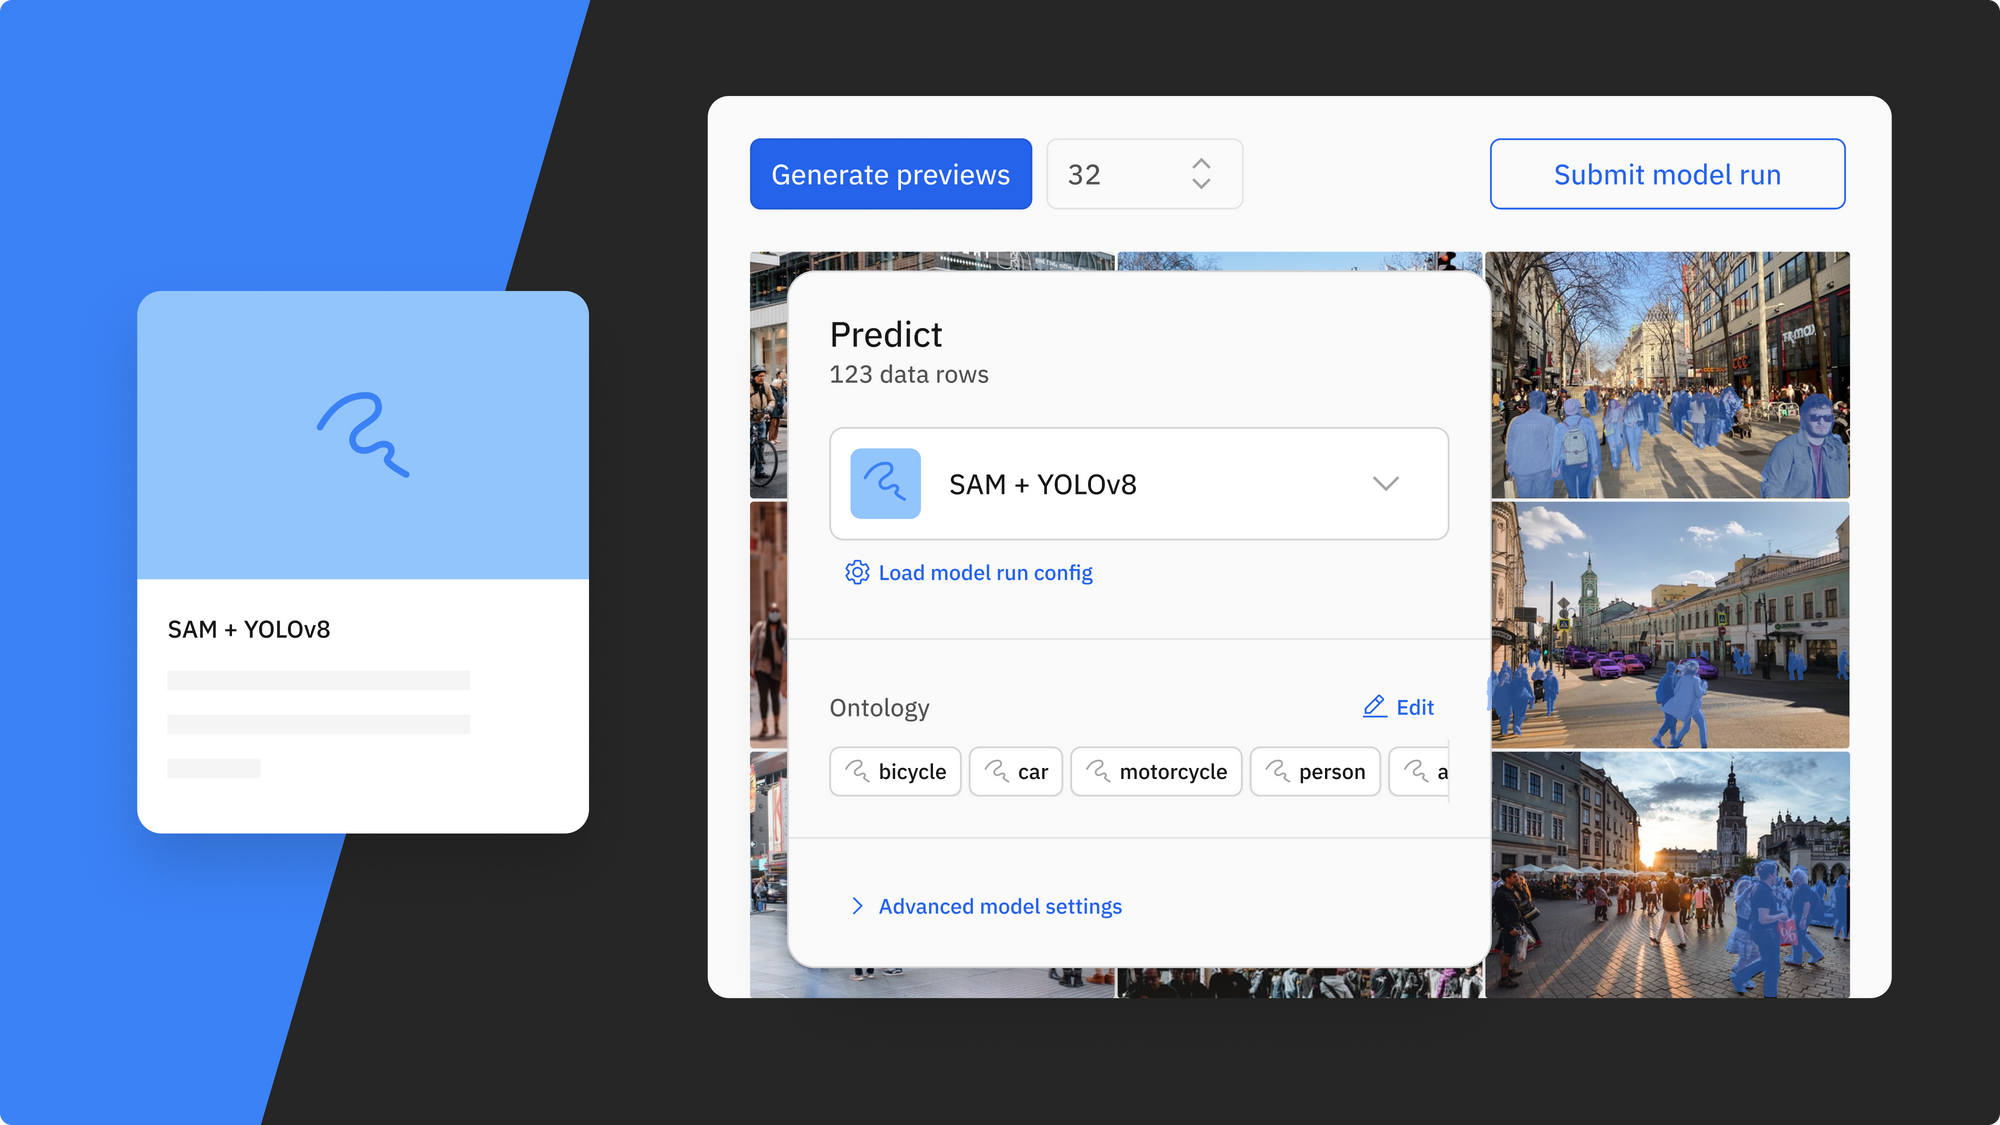
Our upcoming Model Foundry allows you to explore, compare, and use foundation models to create better AI. Rather than spending hours drawing segmentation masks from scratch, you can harness the power of foundation models to pre-label and enrich your image or video data in minutes.
With a variety of models available at your fingertips, you can use multiple computer vision foundation models to streamline your data enrichment workflow and reduce labeling time and cost. With Model Foundry, you will have access to the recently-released SAM model, YOLOv8, and many more. The video below demonstrates how you can use both SAM and YOLOv8 to enrich your data and create pre-labels in minutes. Rather than performing a tedious labeling task, you can focus valuable labeler time on reviewing, verifying, and correcting labels drawn by AI models.
Here’s an overview of the using SAM + YOLOv8 to create pre-labels with Model Foundry:
1) Select the SAM + YOLOv8 model in Labelbox's Model Foundry and view generated predictions on your selected data
2) Once the mask predictions have been generated, masks (from SAM) and classifications (from YOLOv8), you can send these classified mask predictions as pre-labels in one click to your labeling project
3) Directly review or modify pre-labels in the image editor, letting your team of labelers focus on review and correction
With Labelbox’s recent improvements in our image editor, you now have a better way to quickly create, review, or modify labels in the image editor, enabling AI models and humans to collaborate to achieve pixel-perfect masks. Leverage the power of automation and experience fine-grained control over pixels with more accuracy. These improvements to the image editor turn labelers into reviewers – so that you can focus valuable time on human-in-the-loop review and let AI do the heavy lifting.
Create quality segmentation masks with AutoSegment 2.0 powered by Meta Segment Anything
Last year, we released AutoSegment, an automated segmentation tool that allowed you to draw a box around an object and have AI automatically segment the salient object within it.
We’re excited to release a big upgrade to that feature with AutoSegment 2.0. Backed by Meta’s newly-published Segment Anything model (SAM), you can leverage state-of-the-art segmentation directly in the Labelbox image editor.
How it works
Simply draw a box to quickly create a segmentation mask for an object. We’ve introduced a "Hover and Click" mode that highlights parts of the image as the cursor moves around, giving you a peek into what the model sees in real time. When you like what you see, you can click to create an annotation. If it’s not accurate enough, add more positive (green) dots and negative (red) dots to teach the model what pixels to care more about and watch as it corrects itself in real-time. Drawing a bounding box (Box mode) around objects you wish to segment is better suited for targeted labeling as you can guide the model to the most important parts of the image. The Hover and Click mode lets the model intelligently propose masks for you to accept or refine.
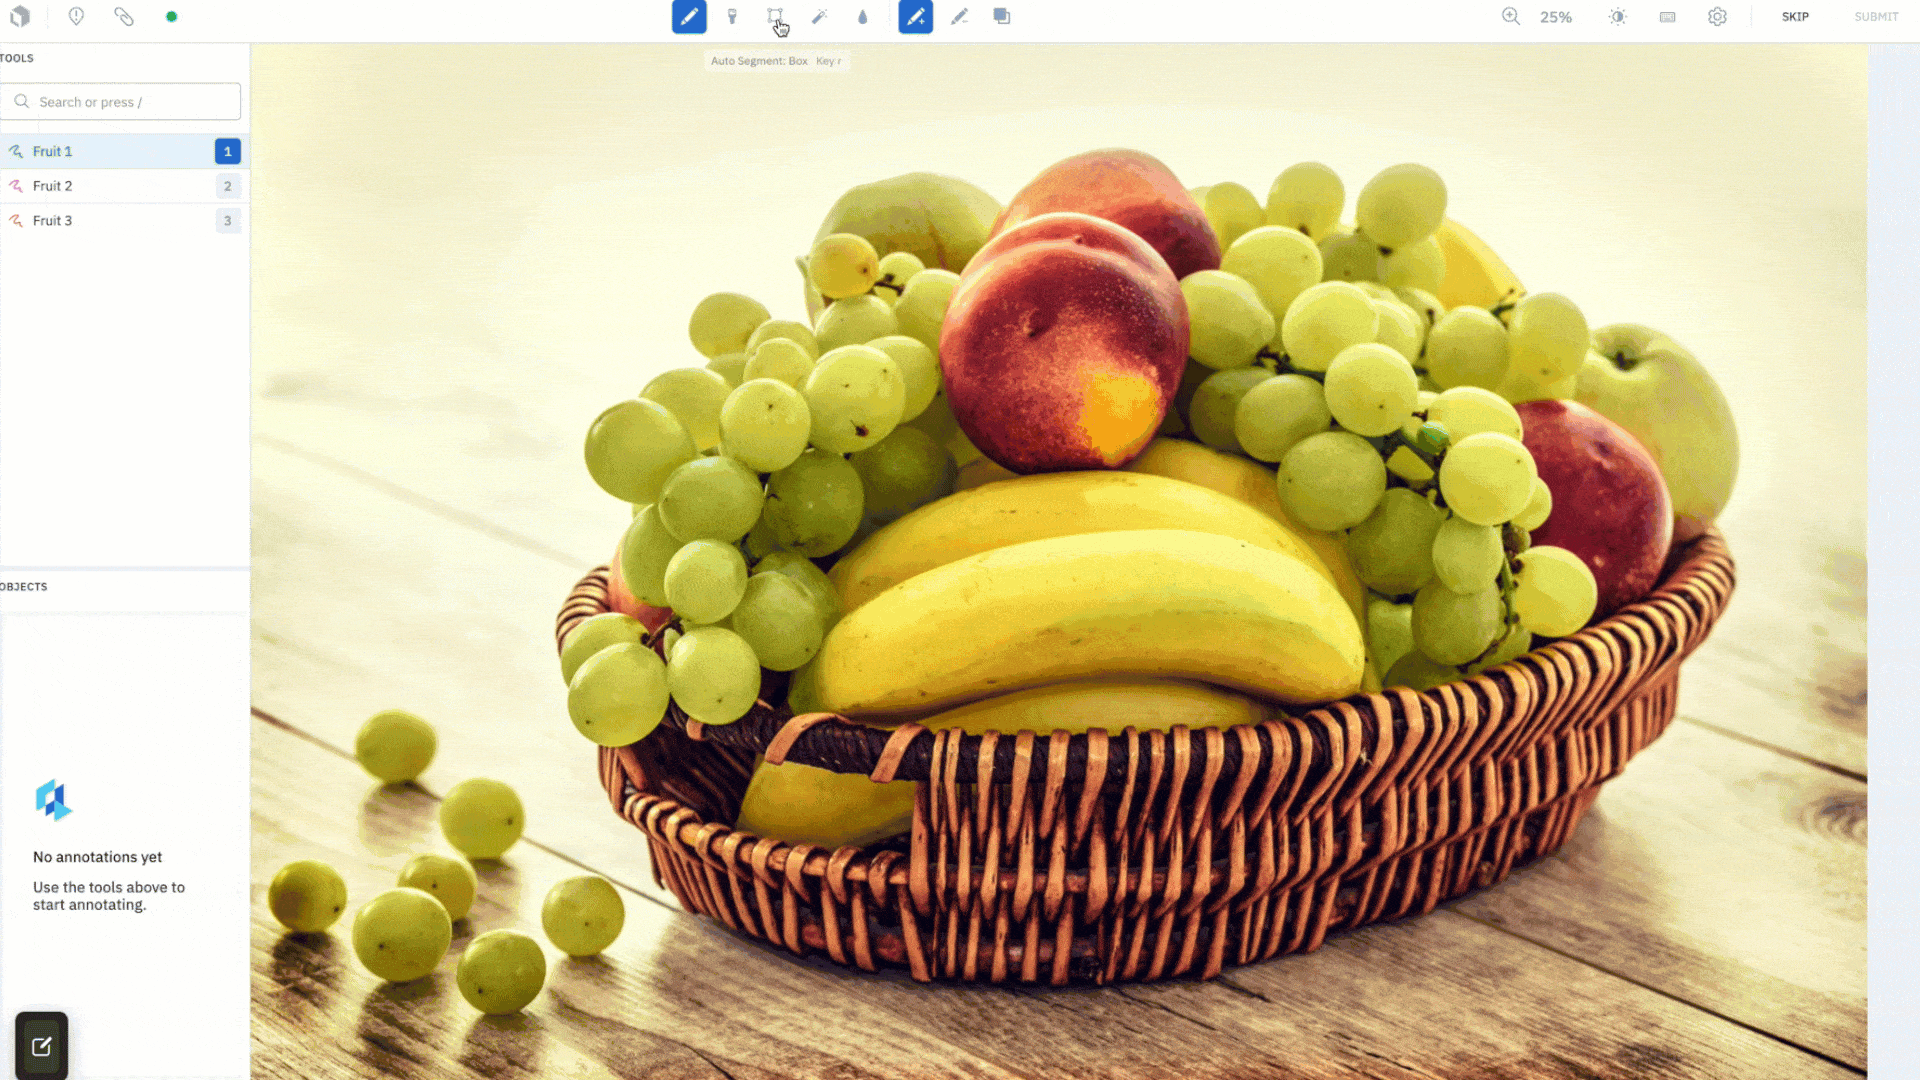
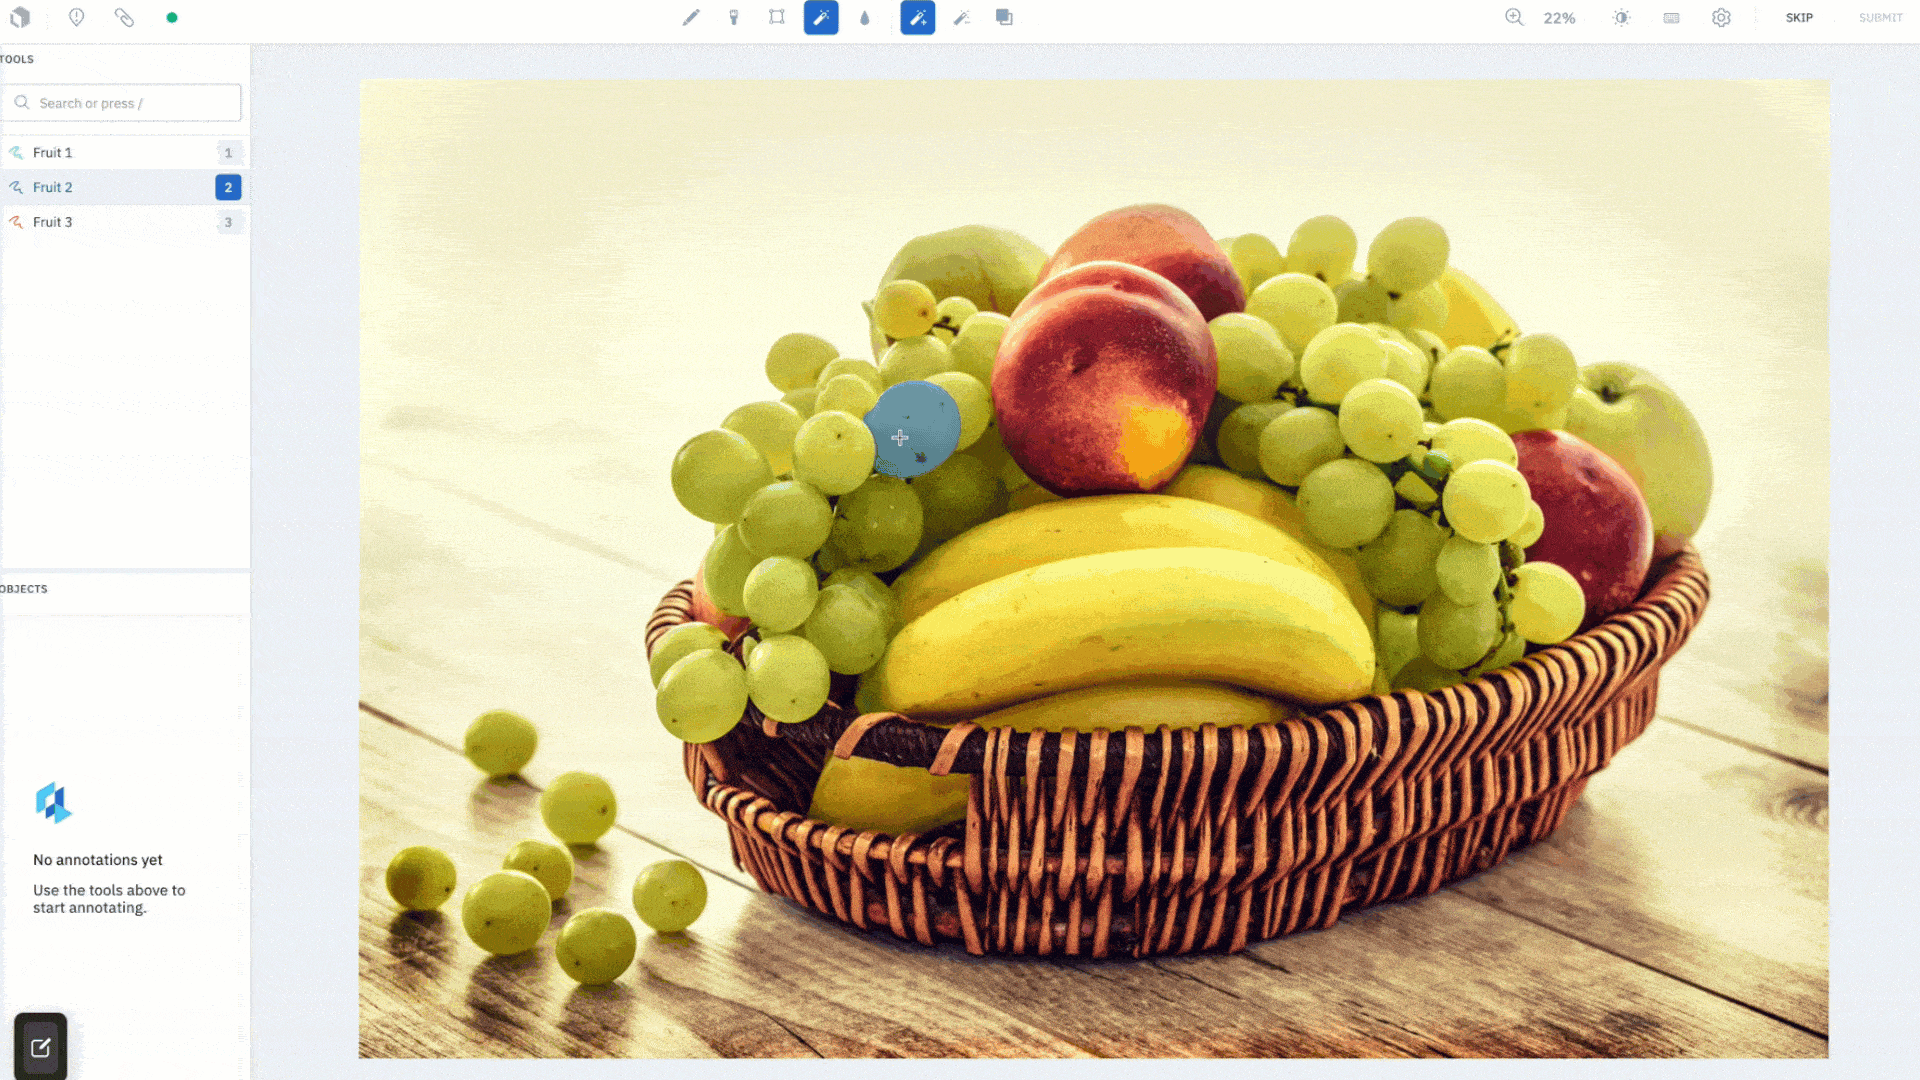
This feature was designed to save your labeling team time. After an initial embedding computation, all model inferences run on the frontend, giving you segmentation masks instantaneously. Create quality annotations faster without worrying about how precise the bounding box is around the object of interest. AutoSegment 2.0 will intuitively predict what you are trying to label, even if part of the object lies outside of the box. Lastly, each mode has a separate hotkey so you can easily switch between them and use the one best suited for your use case.
Draw masks with the brush tool
The brush tool has been a long awaited feature request. Using a brush like mechanism, you can now simply “paint” a mask onto the canvas, allowing you to label images with a single gesture. Change the size of the brush in pixels and adjust its shape, choosing from a circle to square, to achieve maximum precision in labeling hard-to-reach pixels. For example, you can simply brush over the corner of images to label them, rather than going out of the canvas to complete a shape using the pen tool.

Along with the brush tool, you have a brush eraser tool that gives you the ability to quickly wipe any mistakes made, and achieve a clean mask that conforms neatly around an object.
A powerful combination: Using AutoSegment 2.0 and the brush tool
AutoSegment 2.0 and the brush tool is a powerful combination that can significantly improve the speed and accuracy of which you draw segmentation masks for a variety of use cases.
AutoSegment 2.0 gives you the best AI-assisted segmentation at your fingertips, while the brush tool gives you maximum control over every pixel. For example, use AutoSegment 2.0’s Hover and Click mode to bootstrap masks quickly and then use Brush to clean out edges. Or use AutoSegment 2.0 Box mode to automatically draw masks around big, easy objects, and employ the brush tool to label smaller, trickier objects.
Annotate images with no latency
We have upgraded the rendering engine that displays masks on the image editor canvas. It now represents a mask using pixels, the same format it is exported in, instead of a series of points outlining the boundary. This eliminates latencies associated with converting between representations, giving you pixel-perfect mask accuracy so you export exactly what you drew, down to the pixel. This update gives you a snappier editor experience that works with no lag and is the foundation that enables both AutoSegment 2.0 and brush to work extremely fast and accurately.
Labelbox recently announced access to Model Foundry – the easiest way to build model prediction workflows based on your use case, integrate model results with your labeling workflow, and compare and evaluate model results.


