All guides
How to train a chatbot
The rise in natural language processing (NLP) language models have given machine learning (ML) teams the opportunity to build custom, tailored experiences. Common use cases include improving customer support metrics, creating delightful customer experiences, and preserving brand identity and loyalty.
As a result, companies are able to drive tangible business results such as reducing support costs by routing customer support chats to relevant channels or increasing the conversion rate of upsell opportunities through AI augmented sales conversations. As we’ve seen with the success of OpenAI's ChatGPT, we’ll likely continue to see AI powered language experiences penetrate all major industries.
Building a domain-specific chatbot on question and answer data
You can harness the potential of the most powerful language models, such as ChatGPT, Gemini, Llama, etc., and tailor them to your unique business application. Domain-specific chatbots will need to be trained on quality annotated data that relates to your specific use case.
In this guide, we’ll walk you through how you can use Labelbox to create and train a chatbot. For the particular use case below, we wanted to train our chatbot to identify and answer specific customer questions with the appropriate answer.
Step 1: Gather and label data needed to build a chatbot
After gathering your data, the first step will be to identify the main components that are needed to build your chatbot. In this case, the two main components are: questions and answers.
Once you’ve identified the data that you want to label and have determined the components, you’ll need to create an ontology and label your data.
Depending on the amount of data you're labeling, this step can be particularly challenging and time consuming. However, it can be drastically sped up with the use of a labeling service, such as Labelbox labeling services.
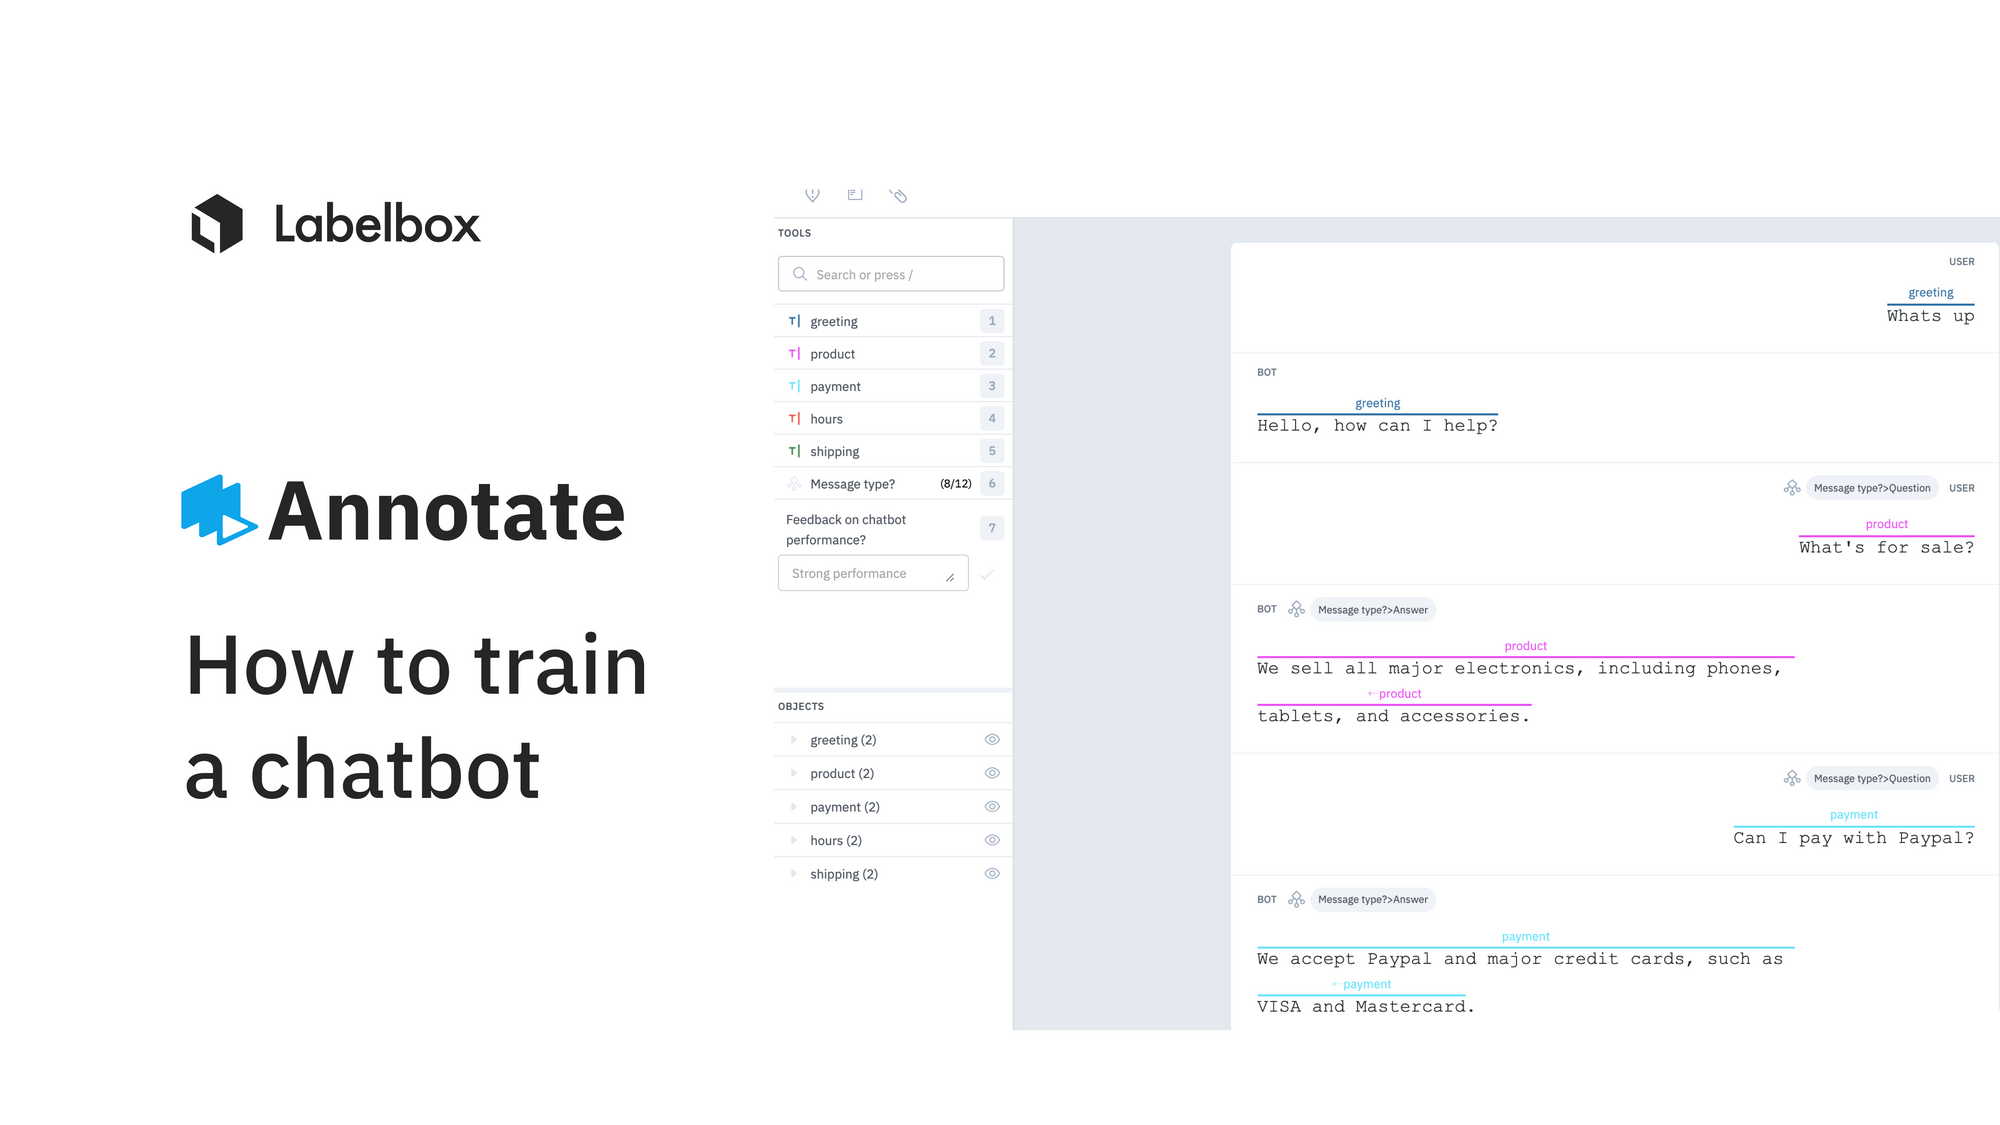
We used Labelbox labeling services to annotate our examples of conversations. The labeling workforce annotated whether the message is a question or an answer as well as classified intent tags for each pair of questions and answers.
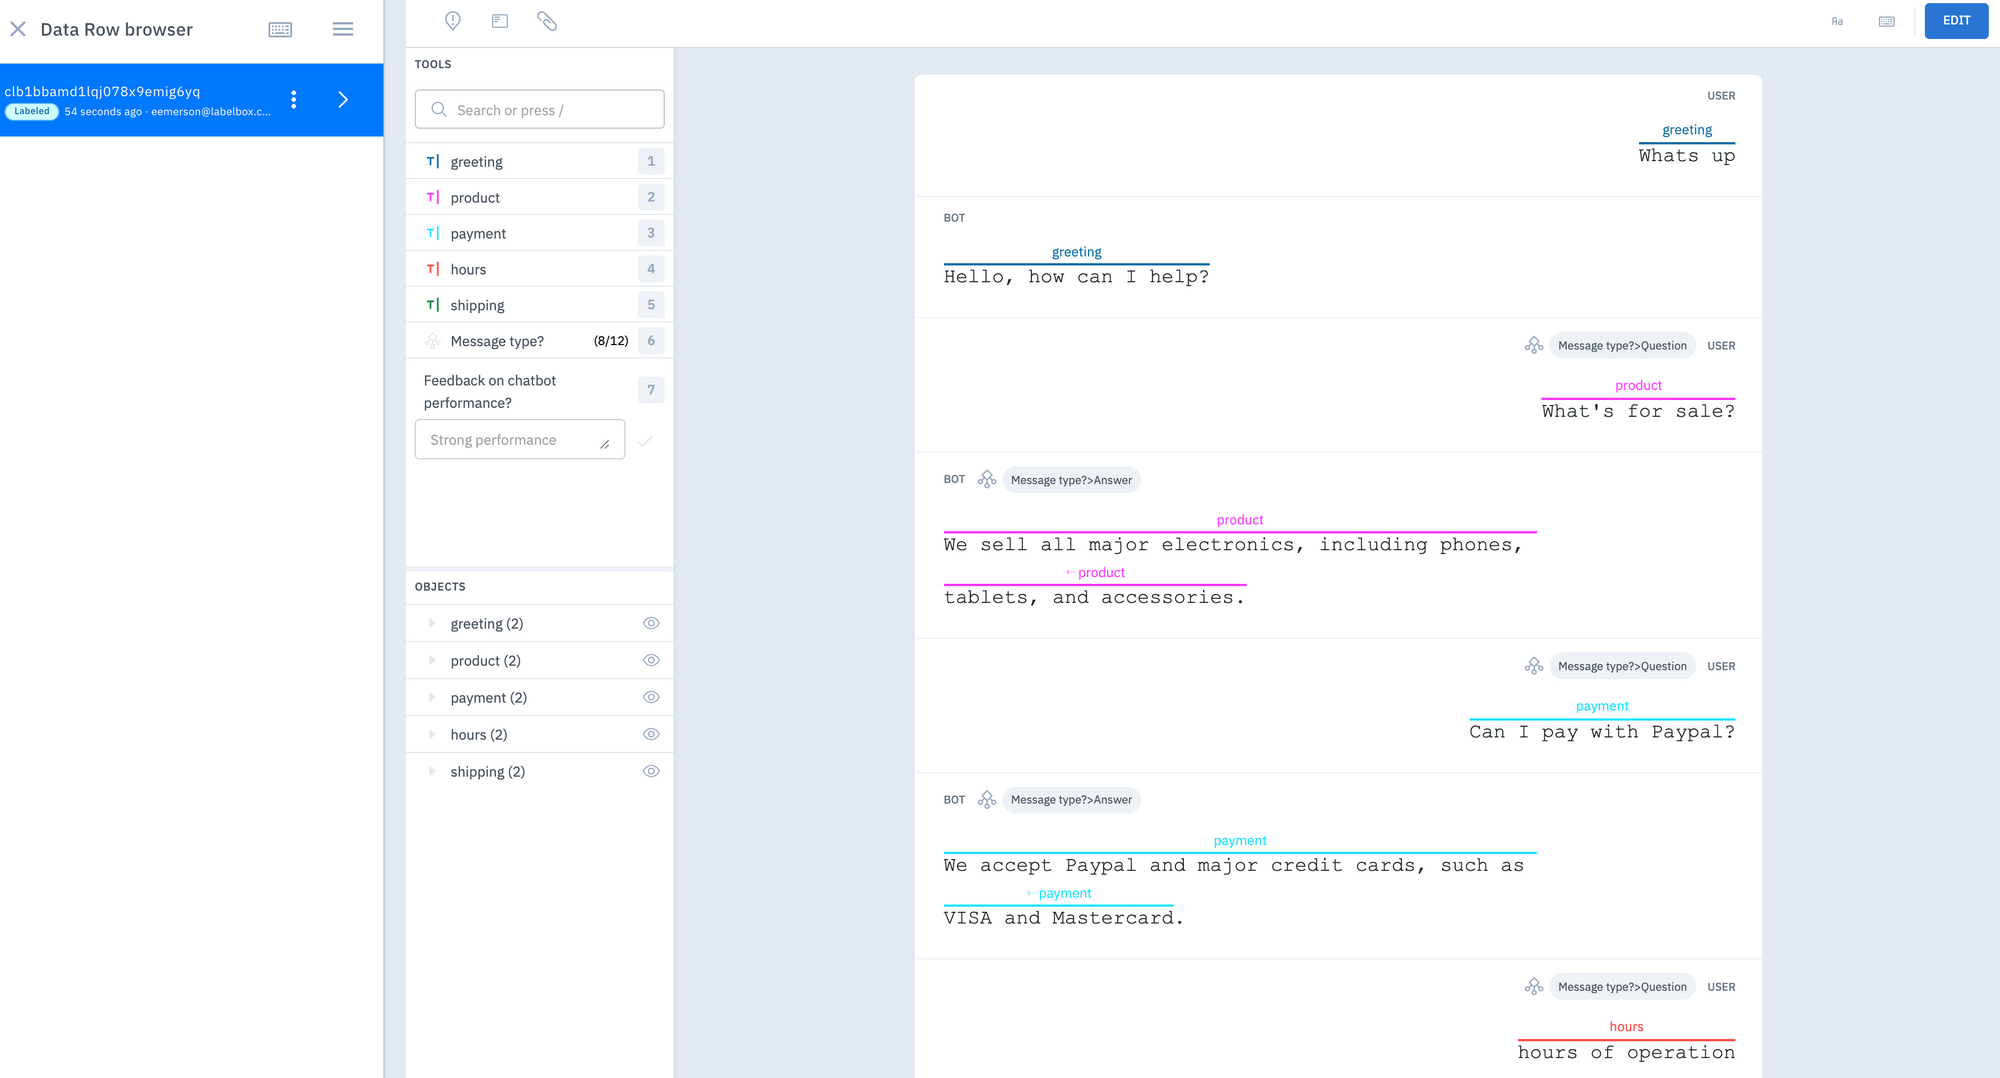
Now, we have a group of intents and the aim of our chatbot will be to receive a message and figure out what the intent behind it is.
If a chatbot is trained on unsupervised ML, it may misclassify intent and can end up saying things that don’t make sense. Since we are working with annotated datasets, we are hardcoding the output, so we can ensure that our NLP chatbot is always replying with a sensible response. For all unexpected scenarios, you can have an intent that says something along the lines of “I don’t understand, please try again”.
Step 2: Download and import modules
import nltk
from nltk.stem.lancaster import LancasterStemmer
stemmer = LancasterStemmer()
nltk.download ('punkt')
from nltk.tokenize import word_tokenize
import numpy as np
import tflearn
import tensorflow as tf
import random
import json
import urllib3
Since this is a python tutorial for building a chatbot, we’ll be using a python notebook as well as the following:
- NLTK (Natural Language Toolkit) - considered the Swiss-knife of NLP, this will help us trim down our words and help with some pre-processing steps
- NumPy - for array management
- TFLearn and TensorFlow
Modules for data:
We’ll need our data as well as the annotations exported from Labelbox in a JSON file.
Urllib3 - this is relevant when working with Labelbox, we accept a URL of your file so your data can live in your own cloud storage. In the below code snippet, the URL refers to our data:
[ ] http = urllib3.PoolManager()
	r = http.request ('GET', url)
    data = json.loads (r.data.decode('utf-8'))
Once the data has been imported, you can start playing around with it. We recommend printing your data to confirm that you’ve imported it correctly.
The next step in building our chatbot will be to loop in the data by creating lists for intents, questions, and their answers.
Step 3: Pre-processing the data
We need to pre-process the data in order to reduce the size of vocabulary and to allow the model to read the data faster and more efficiently. This allows the model to get to the meaningful words faster and in turn will lead to more accurate predictions.
In addition to tokenization and stemming (discussed below), we’ll need to:
- Remove punctuation
- Transform all of our text to lowercase
- Remove all duplicates
Step 4: Tokenization
Tokenization is the process of dividing text into a set of meaningful pieces, such as words or letters, and these pieces are called tokens. A token is essentially the smallest meaningful unit of your data. This is an important step in building a chatbot as it ensures that the chatbot is able to recognize meaningful tokens.
The first thing we’ll need to do in order to get our data ready to be ingested into the model is to tokenize this data.
[ ] for intent in data["intents"]:
		for question in intent["questions"]:
          tokens = nltk.word_tokenize(question)
          words.extend(tokens)
          docs_questions.append(tokens)
          docs_intents.append(intent['tag'])

        if intent["tag"] not in labels:
        	labels.append(intent["tag"])
Step 5: Stemming
Stemming is a process where words are reduced to a root by removing inflection through dropping unnecessary characters.
For example, reducing words with suffixes such as ‘smarter’, ‘smartest’, etc. to their stem, which is simply ‘smart’.
words = [stemmer.stem(token.lower()) for token in words if token != ['>', '<', '\\', ':', '-', ',', '#','[' , ']', '/', '//', '_', '(', ')']]

words = sorted(list(set(words)))
labels = sorted(labels)
Step 6: Set up training and test the output
So far, we’ve successfully pre-processed the data and have defined lists of intents, questions, and answers.
However, these are ‘strings’ and in order for a neural network model to be able to ingest this data, we have to convert them into numPy arrays. In order to do this, we will create bag-of-words (BoW) and convert those into numPy arrays.
Step 7: Create a bag-of-words (BoW)
A bag-of-words are one-hot encoded (categorical representations of binary vectors) and are extracted features from text for use in modeling. They serve as an excellent vector representation input into our neural network.
For our chatbot and use case, the bag-of-words will be used to help the model determine whether the words asked by the user are present in our dataset or not.
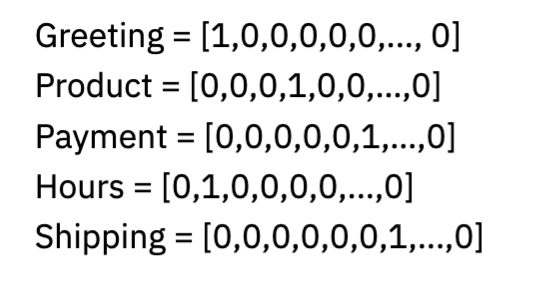
To create a bag-of-words, simply append a 1 to an already existent list of 0s, where there are as many 0s as there are intents.
[ ] for intent in data["intents"]:
		for question in intent["questions"]:
          tokens = nltk.word_tokenize(question)
          words.extend(tokens)
          docs_questions.append(tokens)
          docs_intents.append(intent['tag'])

        if intent["tag"] not in labels:
        	labels.append(intent["tag"])
Step 8: Convert BoWs into numPy arrays
input = np.array(input)After creating a bag-of-words, the array should look like the below:
bag_of_words("Hey how are you", words)

array([0., 0., 1., 0., 0., 0., 0., 0., 1., 0., 0., 0., 0., 0., 0., 0., 0.,0., 0., 0., 0., 0., 0., 0., 0., 0., 0., 0., 0., 0., 0., 0., 0., 1., 0., 0., 1., 0., 0., 0., 0., 0., 0., 0., 0., 0., 0., 0., 0., 0., 0., 0., 0., 0., 0., 0., 0., 0., 0., 0., 0., 0., 0., 0., 0., 0., 0., 0., 0., 0., 0., 0., 0., 0., 0., 0., 0., 0., 0., 0., 1.])
We recommend storing the pre-processed lists and/or numPy arrays into a pickle file so that you don’t have to run the pre-processing pipeline every time.
Step 9: Build the model for the chatbot
After the bag-of-words have been converted into numPy arrays, they are ready to be ingested by the model and the next step will be to start building the model that will be used as the basis for the chatbot.
Since this is a classification task, where we will assign a class (intent) to any given input, a neural network model of two hidden layers is sufficient.
For this step, we’ll be using TFLearn and will start by resetting the default graph data to get rid of the previous graph settings.
#resetting default settings
tf.compat.v1.reset_default_graph()
We can then proceed with defining the input shape for our model. For our use case, we can set the length of training as ‘0’, because each training input will be the same length. The below code snippet tells the model to expect a certain length on input arrays.
net = tflearn.input_data(shape=[None, len(training[0])])The next step will be to define the hidden layers of our neural network. The below code snippet allows us to add two fully connected hidden layers, each with 8 neurons.
net_h1 = tflearn.fully_connected(net, 8)
net_h2 = tflearn.fully_connected(net, 8)
Similar to the input hidden layers, we will need to define our output layer. We’ll use the softmax activation function, which allows us to extract probabilities for each output. Lastly, we’ll apply regression to our neural network.
net = tflearn.fully_connected(net, len(output[0], activation="softmax")
net = tflearn.regression(net)
After these steps have been completed, we are finally ready to build our deep neural network model by calling ‘tflearn.DNN’ on our neural network.
model = tflearn.DNN(net)
Step 10: Model fitting for the chatbot
Model fitting is the calculation of how well a model generalizes data on which it hasn’t been trained on. A well-fitted model is able to more accurately predict outcomes. This is an important step as your customers may ask your NLP chatbot questions in different ways that it has not been trained on.
Once our model is built, we’re ready to pass it our training data by calling ‘the.fit()’ function. The ‘n_epochs’ represents how many times the model is going to see our data. In this case, our epoch is 1000, so our model will look at our data 1000 times.
When our model is done going through all of the epochs, it will output an accuracy score.
Step 11: Model predictions for the chatbot
Since our model was trained on a bag-of-words, it is expecting a bag-of-words as the input from the user.
In order for us to train our model to make predictions on new data, questions that a customer might ask will have to be converted to B.O.Ws, we’ll need to create a function that will allow us to convert incoming questions into bag-of-words.
def bag_of_words(sentence, words):
	bag = np.zeros(len(words))
    sentence_words = nltk.word_tokenize(sentence)
    sentence_words = [stemmer.stem(wod.lower)) for word in sentence_words]

	for sw in sentence_words:
    	for i,word in enumerate(words):
        	if word==sw:
            	bag[i] +=1

   	return np.array(bag)
Step 12: Create a chat function for the chatbot
The next step will be to create a chat function that allows the user to interact with our chatbot. We’ll likely want to include an initial message alongside instructions to exit the chat when they are done with the chatbot.
The user can simply ask questions by using the input() method as follows:
input = input("You: ")
Step 13: Classifying incoming questions for the chatbot
When a customer asks our chatbot a question, the input from the user will be converted into a bag-of-words using the above function (in step 10) and will run through the model using ‘model.predict()’, where the model will then try to classify the input into the various classes (intent) by predicting their probabilities.
The arg max function will then locate the highest probability intent and choose a response from that class.
results_index = np.argmax(results) A safe measure is to always define a confidence threshold for cases where the input from the user is out of vocabulary (OOV) for the chatbot. In this case, if the chatbot comes across vocabulary that is not in its vocabulary, it will respond with “I don’t quite understand. Try again or ask a different question”.
#adding a confidence threshold
	if results[results_index] > 0.7:
    	print(random.choice(responses))
    else:
    	print("I don't quite understand. Try again or ask a different question.")
Step 14: Customize your chatbot
You can customize your chatbot to make it specific to your use case or business needs.
In order to do so, you’ll need to:
- Create your own domain specific dataset
- Create an ontology that would be your tags
- Have your data labeled by AI experts with Labelbox labeling services, Labelbox Alignerr Connect, or an internal labeling team using the Labelbox Platform
You can now reference the tags to specific questions and answers in your data and train the model to use those tags to narrow down the best response to a user’s question.
Get started today
Domain specific chatbots can be tailored from powerful language models for your specific use case or unique business application.
To start training your own AI chat bot, check out the solutions Labelbox offers here:
- Explore our on-demand labeling services: Utilize and build your own team of SMEs to create specialized, high-quality conversational data.
- Try out the conversational text editor for free: Ready to experiment with building your own chatbots? Easily sign up and get started.
- Learn more: See in action how to annotate conversational text for chatbot use cases.
We’re happy to help answer any questions. Reach out to us anytime on our contact us page.