
 All guides
Introducing Export V2: How to export data with more granular control

If you already leverage Labelbox to enrich and label your unstructured data, you know how important it is to export your data insights in the right format and connect it with your downstream data workflow. Whether you want to store your data in a database, a cloud-hosted table, an ML training pipeline, or a production environment, you need a flexible and powerful export system that can handle your specific needs.
That’s why we’re excited to introduce a new way to export your data. This new system gives you more granular control over your data exports across the Labelbox platform and SDK. With this new way to export, you can:
- Export the exact Data Rows you are interested in. You can use various filters in the Catalog and Data row tabs, or hand-select the data rows to export. For example, you can grab only the data rows that have received new labels, metadata, or issues updates within the last 24 hours.
- Configure the export to include exactly the right information you need. You can build a custom export payload that meets your specific data workflow needs with much faster performance. Learn more about these improvements here.
- Organize your assets into a data-row-centric framework that’s easy to structure and analyze.
- Leverage improved annotation formats to rapidly export annotations.
While we will continue supporting the Export v1 system until December 31, 2023, we encourage you to gradually start migrating all of your export workflows to this updated export workflow (Export v2). The Export v1 and Export v2 workflows may be used in tandem until Export v1 is sunset on December 31st.
Please refer to our documentation to learn more about export specifications and compare the old Export v1 and new Export v2 systems: image | video | text | documents | geospatial/tiled imagery | audio | conversational text | HTML | DICOM
What’s new in Export v2
Data row-centric asynchronous exports
The previous export system (Export v1) relied upon a less flexible label-centric export that limited access to all the information you might need about a Data Row. Within Export v2’s Data Row-centric context, you can access much more information — including fields like:
- metadata,
- attachment,
- workflow history,
- model predictions,
- media attributes
- batch id,
- and issues, alongside with the labels.
By reframing exports based on Data Rows, we’ve made it much more intuitive for you to integrate with your data tables that are organized around your team’s unique assets and data rows.
- Additionally , now when you trigger an export job, it will occur asynchronously in the background, unblocking your workflow so you can avoid waiting.
- If you are using the Labelbox UI, you can access the task status in the notification center.
- If you are using SDK, you can query the task for status and results.
Export from a dataset or a slice, with the option to grab labels from multiple projects and model runs.
A data row can have labels from multiple projects, or have predictions from multiple model runs. Using this new way to export through Catalog, or through the SDK, you can easily grab all the information about a Data Row.
Use data row filters to select a subset of data rows for export:
- In the UI, you can build your filters within a project in the Data Rows tab, build filters in a dataset / slice in Catalog, or build filters in Model using model run filters. You can then choose to export only the filtered data rows.
- In the UI and SDK, you can use the 'last_activity_at' filter to export only the data rows that have the creation and modification of labels, metadata, status, comments and reviews in a user-specified time range. This applies to a project in Annotate and a dataset or slice export.
- In the UI and SDK, we added a support for a 'label_created_at' filter for you to export only the data rows that have the creation of labels in a user-specified time range. This applies to a project in Annotate and a dataset or slice export.
- In the UI, you can hand-pick data rows for export. Similarly in SDK, we added support for 'data_row_ids' filter to export only the data rows that you are interested in.
Configure exports to selectively include or exclude certain information on a data row
- We recognize different teams have unique needs around what they need from exports. For example, labeling team would love to understand the performance and consensus scores of a labeling project, whereas a developer would like to know the metadata and media attributes on a data row.
- Export v2 now not only covers all possible fields on a data row, but also makes it configurable so that you can grab only the necessary payload of export information with faster performance. See this table to check all available option fields that you can include/exclude in your exports.
Remove the caching for exports
Export v1 used to cache exports for 30 minutes. In Export v2, you will always get a fresh export and you can run one export asynchronous task on a project at a time.
Simplified and improved export payloads
- We've converted all fields in the export payload into snake case.
- Rather than isolating them into another JSON file, we've improved the video and DICOM exports to contain all frame annotations in the export ndjson file. and Export v2 provides three representations of objects in frames: “frames”, “segments”, and “key_frame_feature_map” to facilitate your different needs of downstream workflows. See examples in Video and DICOM exports.
Exporting via UI
From Labelbox's UI, you can access the export function through the drop-down menu after selecting a subset of data rows. You can export the entire project, model, dataset, or slice from a set of filters or a selection of data rows within them.
Below are some examples of Export v2 in action. For more detailed information, please refer to our documentation.
Annotate (A labeling project)
Model (A model run)
Catalog (A dataset and slices)
Exporting data via SDK
For developers that would like to programmatically feed exports directly into downstream data workflows or build automatic workflows to retrieve fresh data exports on a regular basis, we recommend Export v2 SDK. It provides flexibility to control what data you want to export.
Project Export v2
# Set the export params to include/exclude certain fields. Make sure each of these fields are correctly grabbed
export_params= {
  "attachments": True,
  "metadata_fields": True,
  "data_row_details": True,
  "project_details": True,
  "performance_details": True
}

# You can set the range for last_activity_at and label_created_at. You can also set a list of data
# row ids to export.
# For context, last_activity_at captures the creation and modification of labels, metadata, status, comments and reviews.

# Note: This is an AND logic between the filters, so usually using one filter is sufficient.
filters= {
  "last_activity_at": ["2000-01-01 00:00:00", "2050-01-01 00:00:00"],
  "label_created_at": ["2000-01-01 00:00:00", "2050-01-01 00:00:00"],
  "data_row_ids": ["data_row_id_1", "data_row_id_2"]
}

export_task = project.export_v2(params=export_params, filters=filters)
export_task.wait_till_done()

if export_task.errors:
  print(export_task.errors)

export_json = export_task.result
print("results: ", export_json)
You can check out SDK examples of exporting from datasets, slices, and model runs in this documentation.
Receiving updates via Webhooks
For teams that would like to get near real-time updates for each change on a data row, we recommend webhooks as a better option. Export v2 format can now be used for webhooks to receive the following events from project:
- LABEL_CREATED
- LABEL_UPDATED
- LABEL_DELETED
- REVIEW_CREATED
- REVIEW_UPDATED
- REVIEW_DELETED
- WORKFLOW
You can configure a webhook that returns Export v2 in Project whenever an event is triggered. See more details in this Webhook Guide.
For example, you can use ngrok to expose a local port.
ngrok http 3001This will generate an address that looks like ` https://887d-2601-645-8000-3a90-9cb4-7d1b-d9b4-6714.ngrok.io` and it will forward all requests to your localhost:3001.
In your terminal, create a python file that contains the following code to receive webhook payload. Make sure to change your secret.
from flask import Flask, request
import hmac, hashlib
import json
import threading
from werkzeug.serving import run_simple
# This can be any secret that matches your webhook config (we will set later)
secret = b"CHANGE-ME"
# Example for server-side code to receive webhook events
app = Flask(__name__)
@app.route("/webhook-endpoint", methods=["POST"])
def print_webhook_info():
payload = request.data
computed_signature = hmac.new(secret, msg=payload,
digestmod=hashlib.sha1).hexdigest()
if request.headers["X-Hub-Signature"] != "sha1=" + computed_signature:
print(
"Error: computed_signature does not match signature provided in the headers"
)
return "Error", 500, 200
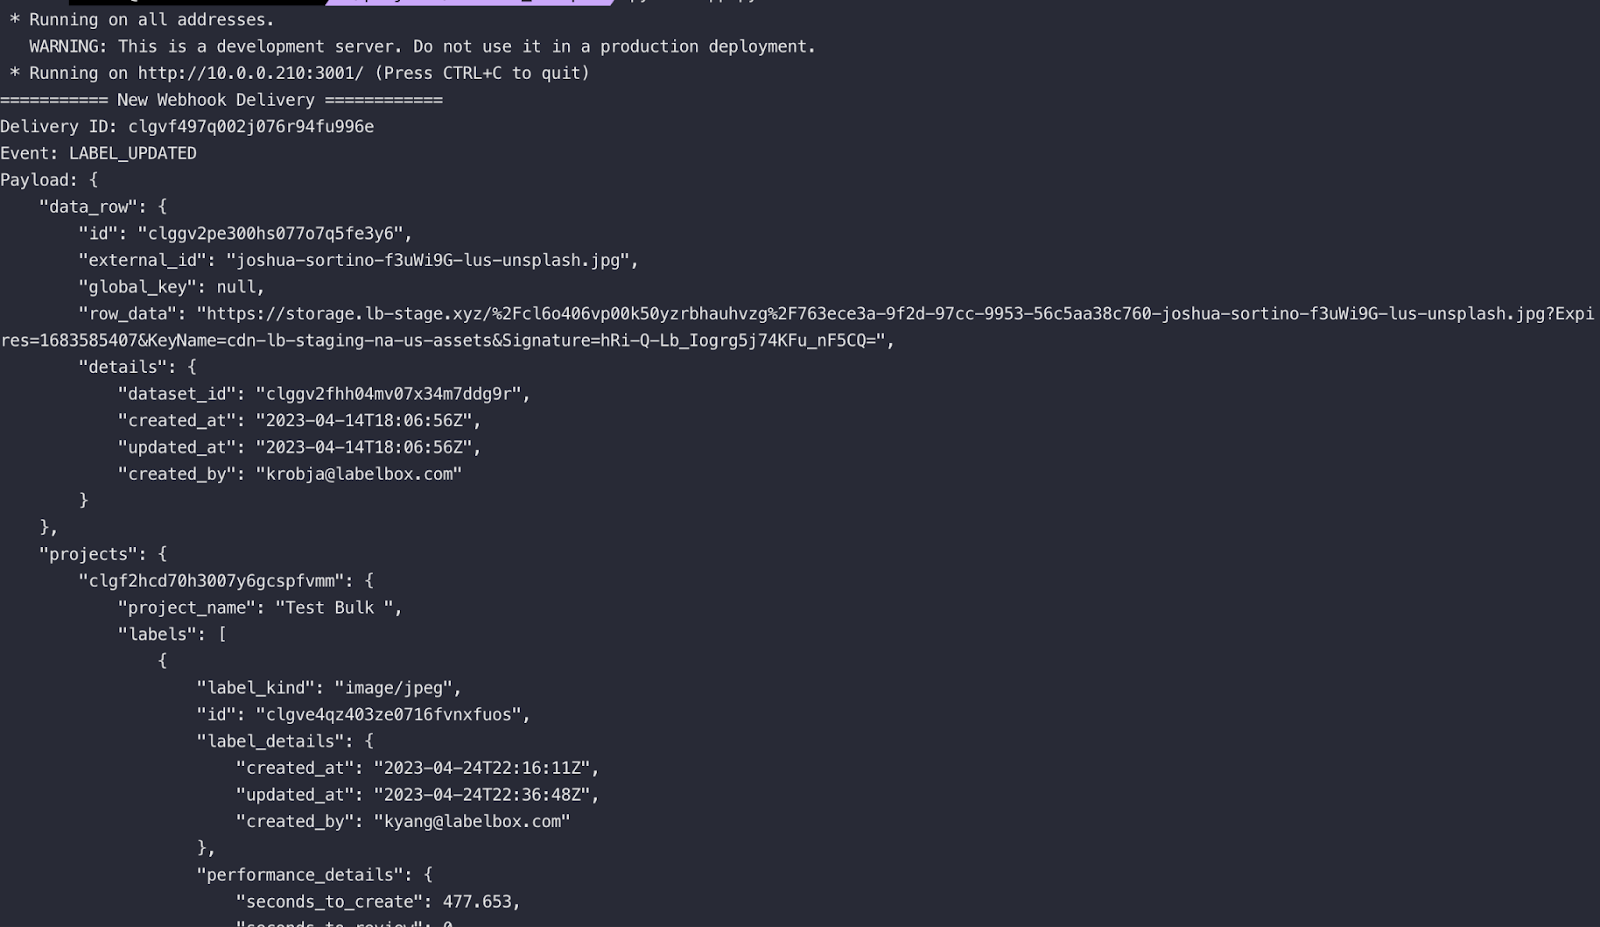
print("=========== New Webhook Delivery ============")
print("Delivery ID: %s" % request.headers["X-Labelbox-Id"])
print("Event: %s" % request.headers["X-Labelbox-Event"])
print("Payload: %s" %
json.dumps(json.loads(payload.decode("utf8")), indent=4))
return "Success"
thread = threading.Thread(target=lambda: run_simple("0.0.0.0", 3001, app))
thread.start()Then run this script to start receiving requests from the ngrok address:
ngrok http 3001Now, you can configure a webhook in Labelbox's Project setting.
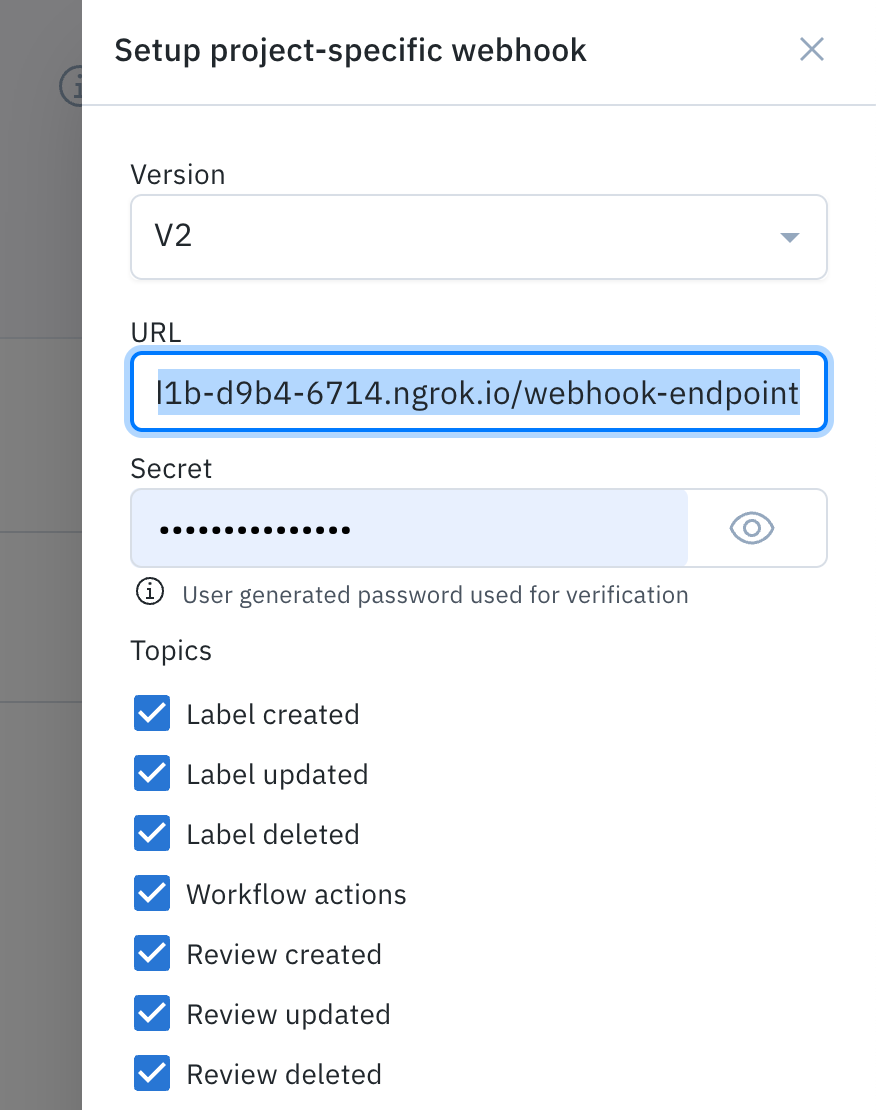
- Click Set up webhook
- Choose V2 as the version of the webhook
- Paste in the ngrok address plus /webhook-endpoint. You will need to write the secret to match the secret you specified in your app.py script
- Finally, select the topics you want to subscribe to
Now that you've created a webhook, everytime there is a new event triggered (such as updating a label), you will receieve the payload at / webhook-endpoint.
The improved and datarow-centric format of Export v2 empowers you to export with more granularity by including or excluding variables based on your project’s unique needs. Offering a more seamless user experience, the new export format more consistently mirrors our import format and aligns with annotation schema available in the platform.
As you migrate from Export v1 to Export v2 workflows, please refer to our documentation for more detailed instructions on how to export your data through the UI or through the Python SDK.


