All guides
How to build a content moderation model to detect disinformation
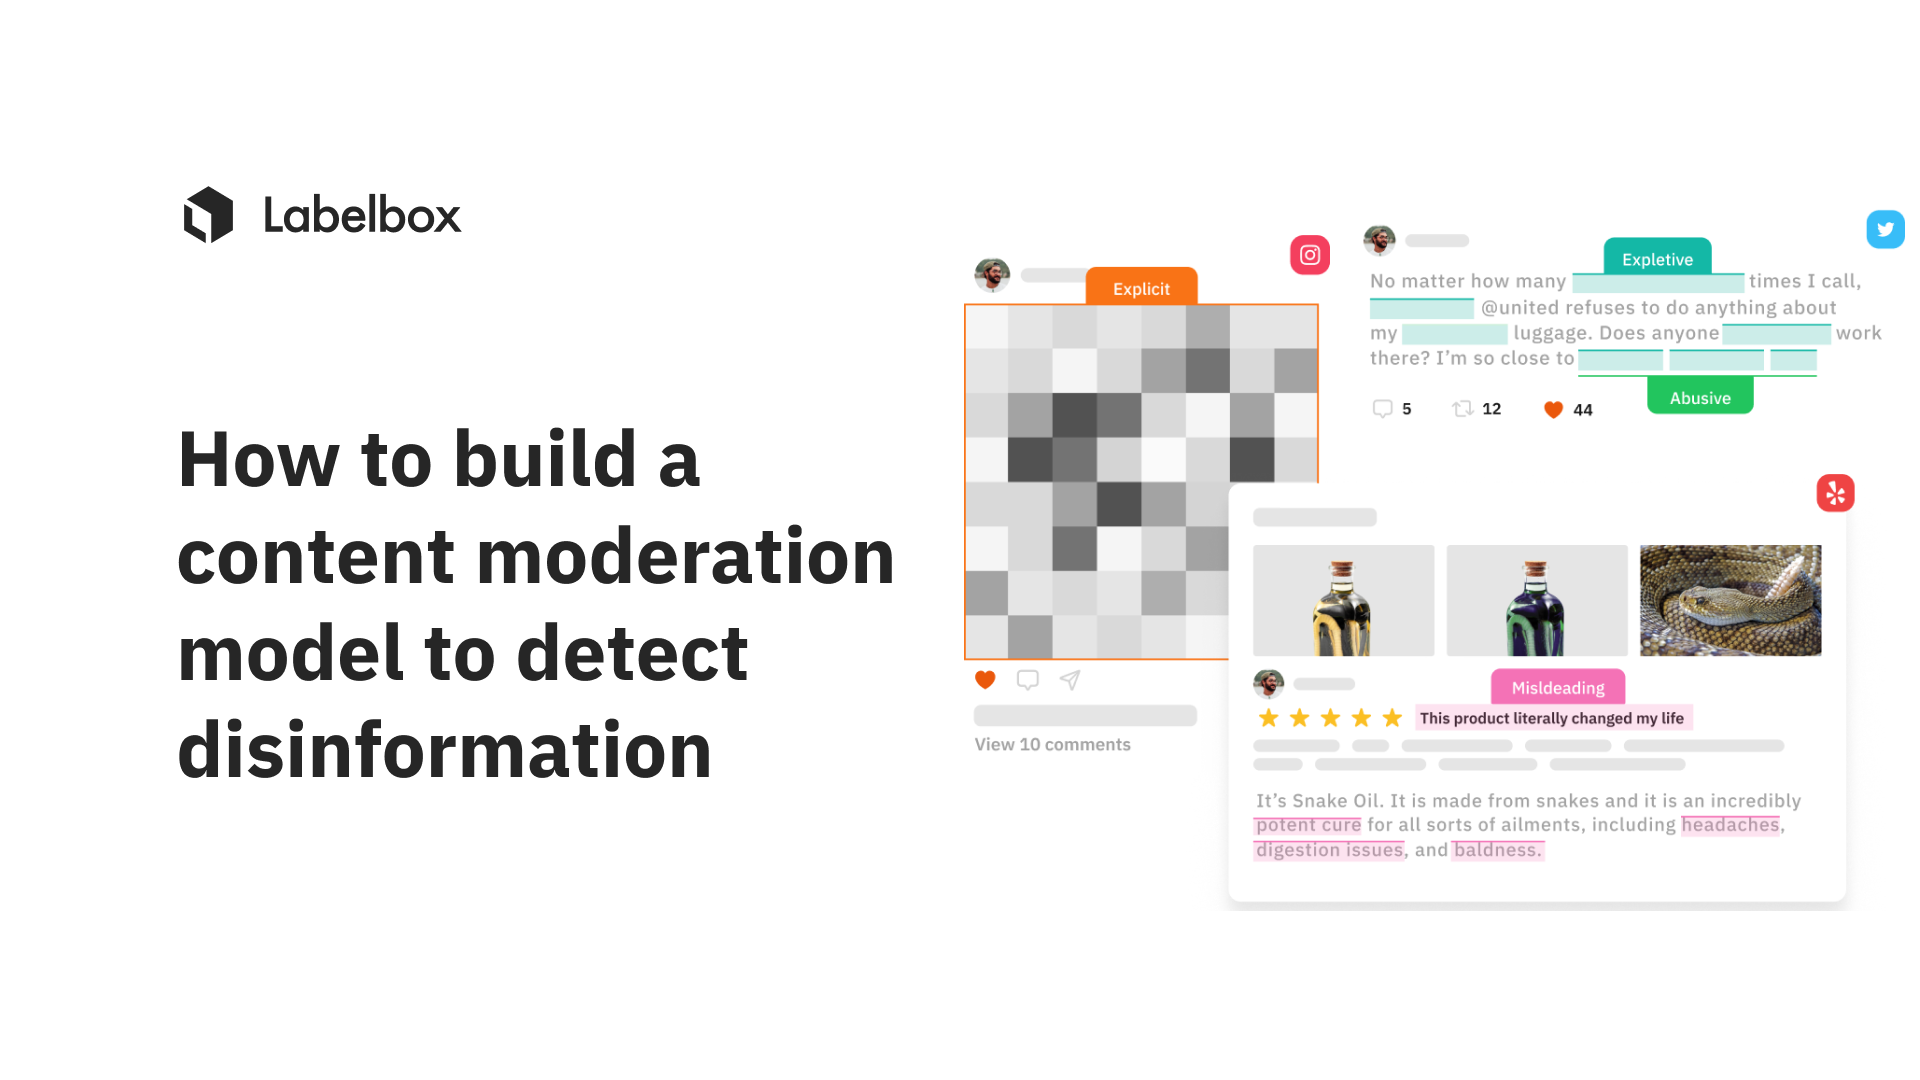
As user-generated content increases and the amount of data grows, trust and safety on digital platforms is becoming increasingly critical. Content that goes unmoderated can not only directly hurt brand reputation, but it can directly impact a businesses bottom line through lost users, advertisers, and revenue. Regulators worldwide are also implementing stricter rules around content moderation, online safety, misinformation, and disinformation.
To address these growing risks, more businesses are looking to AI and machine learning as part of robust trust and safety strategies. State-of-the-art AI solutions enable unprecedented scale, nuance, consistency, and efficiency in identifying and taking action on high-risk user content.
However, businesses can face multiple challenges when implementing AI for trust and safety. This includes:
- Dynamic content landscape: Models are only as good as the data they are trained on. As new trends or content emerges, AI models need constant retraining on compelling diverse, unbiased, and large labeled datasets to reinforce content moderation.
- Ethical risks & biases: Without careful design, machine learning models risk exacerbating biases and are prone to hallucination. Teams need a way to monitor and evaluate model training with ethical oversight.
- Cost & scalability: Developing accurate custom AI can be expensive in data, tools, and expertise. Leveraging foundation models, with human-in-the-loop verification, can help accelerate model development by automating the labeling process.
Labelbox is a data-centric AI platform that enables businesses to build state-of-the-art AI solutions for enhanced controls, transparency, efficiency in content moderation, and greater brand safety. Rather than spending valuable time building an in-house solution or relying on disparate systems, businesses can explore data, use foundation models for assisted-enrichment, and evaluate models to quickly build more accurate AI systems for analyzing user behavior, detecting disinformation, and enhancing ad-targeting.
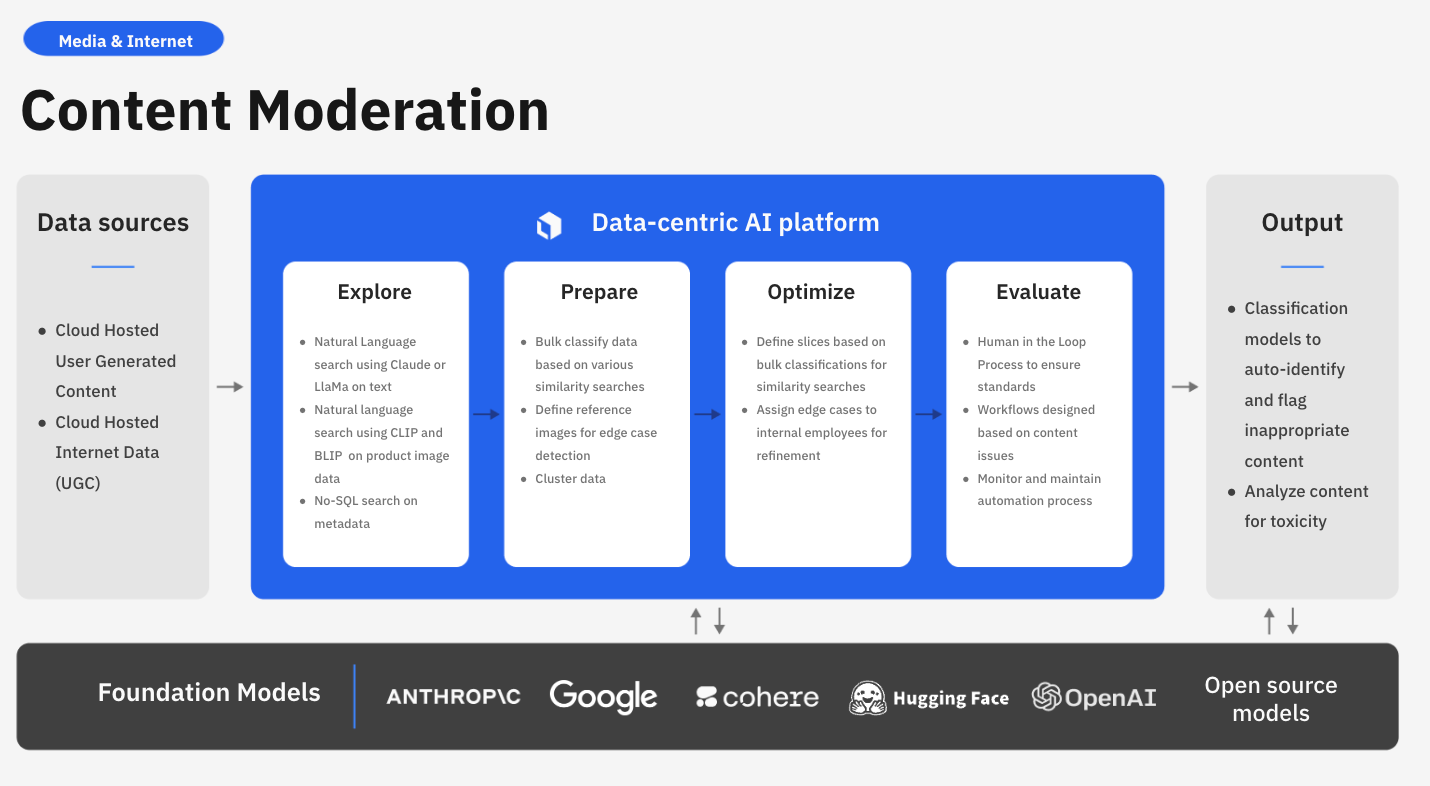
In this guide, we’ll walk through how your team can leverage Labelbox’s platform to build a model for content moderation, such as detecting and classifying disinformation, allowing you to elevate brand trust and improve the trust and safety of your applications.
See it in action: How to build a content moderation model to detect disinformation
The walkthrough below covers Labelbox’s platform across Catalog, Annotate, and Model. We recommend that you create a free Labelbox account to best follow along with this tutorial.
Part 1: Explore and enhance your data: Google Colab Notebook
Part 2: Create a model run, fine-tune an LLM, and evaluate model performance: Google Colab Notebook
Part 1: Explore and prepare your data
Follow along with the tutorial and walkthrough in this Colab Notebook. If you are following along, please make a copy of the notebook.
Ingest data into Labelbox
With the growing amount of user-generated content, businesses want to ensure that there is no inappropriate content or disinformation happening on their platform. To implement content moderation at scale, teams can leverage AI to analyze and detect harmful content and classify disinformation from existing data stored in a cloud bucket or a local folder.
To upload a sample of your content to Labelbox for labeling, you have a few options:
Upload a dataset through the SDK
Using the Google Colab notebook, upload the sample dataset into Labelbox or use it to import data from various sources like Bigquery, Databricks, or Snowflake.
In this notebook, we’re going to bring in two libraries of interest:
- Labelbox SDK
- Labelpandas (for bringing tabular data into Labelbox)
You’ll need your Labelbox API key to initiate the Labelbox Client and create a dataset. For this guide, we’ll be using a dataset stored in a Google Cloud bucket as a CSV and we can use Labelpandas to bring this data in.
The provided sample dataset includes:
- An article with a corresponding headline
- When it was retrieved
- Metadata (sorted by source)
- Pre-labels based on if the article contains “disinformation” or not
Upload a dataset through the UI
If you have a dataset from your local file, you can upload it through the Labelbox UI by clicking "new dataset" in Catalog.
Once you’ve successfully uploaded your text, you can browse the dataset in Catalog — along its metadata. You can visualize your data in a no-code interface to quickly pinpoint and curate data for model training.
Search and curate data
You’ll now be able to see your dataset in Labelbox Catalog. With Catalog, you can contextualize your data with custom metadata and attachments to each asset for greater context.
Leverage custom and out-of-the-box smart filters and embeddings to quickly explore product listings, surface similar data, and optimize data curation for ML. You can:
- Search across datasets to narrow in on data containing specific attributes (e.g metadata, media attributes, datasets, project, etc.)
- Automatically find similar data in seconds with off-the-shelf embeddings
- Filter data based on natural language and flexibly layer structured and unstructured filters for more granular data curation
Create and save data slices
If you have a search query that you’re interested in saving or reusing in the future, you can save it as a slice. You can construct a slice by using one or more filters to curate a collection of data rows. Users often combine filters to surface high-impact data and then save the results as a slice.
In this example, we are interested in saving the surfaced data rows as “Climate Articles” so that this filtered dataset can easily be surfaced later on for annotation or data discovery purposes.
Create a labeling project in Annotate
1) Create a text project in Annotate
2) Sample and send your uploaded dataset as a batch to your newly created project. In this case we can send the two dataset slices that we created: “Climate related articles” and “Non-climate related articles”
3) Create an ontology to determine how to structure your data. If you have a previous ontology you’d like to use, you can do so. If not, you’ll need to create a new ontology. For this use case, our ontology consists of two classifications:
- “Does the article contain disinformation?” with two options
- “Is the article climate related?” with two options
4) If you’re relying on an external team of labelers or want to provide your internal labeling team with more instructions, you can upload instructions as a PDF for your labelers during the ontology creation process.
Label the data of interest
Now that we have a project with our data set up in Annotate, we’ll need to label this training data.
Since this project is a classification use case, we can also leverage bulk classification to speed up our labeling process and maximize labeling efficiency. Teams who have used bulk classification in Labelbox have seen labeling time decrease from a full quarter to a few days. Since we’ve leveraged filters in Catalog to identify “Climate related articles,” we can send these articles to our newly created labeling project with pre-labels.
To bulk classify and pre-label data rows, you can:
1) Highlight any data rows of interest, in our use case these would be data rows in the slice "Climate related articles", and select "Manage selection" > "Add classifications"
2) Select the labeling project that you made in the previous step and determine a step of the project’s review workflow that you would like to send the classifications to. In the above demo, we are sending these to the "Initial labeling task" because we want to have a labeler verify that these are indeed all climate related articles
3) Select the desired classification — in this case it would be "Climate related"
4) You can determine the batch’s data row priority (from 1-5) and submit the bulk classification job
Rather than labeling from scratch, a team of labelers can now simply verify or correct the pre-labels used during this bulk classification step.
With Labelbox, you can label your data in the following ways:
1) Internal team of labelers: your team can start labeling directly in the Labelbox editor, utilizing automation tools and maintaining quality with custom workflows to maintain human-in-the-loop review.
2) External team of expert labelers with Labelbox Boost: leverage our global network of specialized labelers for a variety of tasks.
Workforce Boost provides a collaborative platform for labeling services in a self-serve manner — this is great for teams that don’t have the technical expertise to build a machine learning system yet are looking for an easy-to-use technology to get a quick turnaround on quality training data. You can learn more about our Boost offerings here.
3) Create pre-labels with foundation models
In addition to creating pre-labels for classification projects, you have the ability to send model predictions as pre-labels to your labeling project. This can be done in one of two ways:
- Model-assisted labeling: Import computer-generated predictions (or simply annotations created outside of Labelbox) as pre-labels on an asset. The imported annotations will be pre-populated in the labeling editor and a human can correct or verify and submit the prediction as ground truth.
- Model Foundry: Automate data workflows, including data labeling with world-class foundation models. Leverage a variety of open source or third-party models to accelerate pre-labeling and cut labeling costs by up to 90%.
Verify data quality with custom workflows
Content moderation relies heavily on training the model on accurate and verified data. To ensure that you’re producing the most reliable and high-quality training datasets, you can customize your labeling review workflow.
You can create customizable, multi-step review and rework pipelines to drive efficiency and automation for your review tasks. Set a review task based on specific parameters that are unique to your labeling team or desired outcome.
- Initial labeling task: reserved for all data rows that have been queued for labeling
- Initial review task: first review task for data rows with submitted labels
- Rework task: reserved for data rows that have been rejected
- Done task: reserved for data rows that have a) moved through their qualified tasks in the workflow or b) did not qualify for any of the tasks
Part 2: Create a model run, fine-tune an LLM, and evaluate model performance
Follow along with the tutorial and walkthrough in this Colab Notebook. If you are following along, please make a copy of the notebook.
In this part of the tutorial, we’ll be taking the ground truth labels created in Part 1 to fine-tune a large language model (LLM). From there, we’ll evaluate model performance in Labelbox Model to diagnose model strengths and weaknesses and look to continuously boost and improve model performance.
Create a new model
Once you have your labeled data in your project in Annotate, you’re ready to move on to creating a model run in Labelbox Model.
To create a new model, you’ll need to:
1) Navigate to the "Experiments" tab in Model. The "Experiments" tab will be where you can find all model experiments across iterations.
2) Create a new model by selecting the "New model" button.
- Provide a model name
- Select the model ontology — in this case we will select the same ontology we used to create our labeling project that contains the corresponding ground truth data.
- Submit and create a model — before creating a model run, you will also be able to see and verify the number of data rows that are being submitted.
Create a model run
Once you’ve created a new model, we will need to create a new model run.
A model run is a model training experiment — each model run provides a versioned data snapshot of the data rows, annotations, and data splits for that model run. You can upload predictions to the model run and compare its performance against other model runs in a model directory.
The model run we create will be the initial model run for our LLM fine-tuning experiment. To add a new model run:
1) Select "New model run"
2) Give the model run a name (e.g “model run #1”)
3) Set data splits for the model run (for train, validate, and test)
4) Create the model run
After creating a model run, you’ll be able to see the corresponding data rows with ground truth populated into the appropriate train, validate, and test splits. This model run will be the gateway for us to export ground truth data to fine-tune a large language model.

Export ground truth from the model run experiment for fine-tuning
Model training occurs outside of Labelbox. Labelbox Model works with any model training and inference framework, major cloud providers (AWS, Azure, GCS), and any data lake (Databricks, Snowflake).
We’ll be using this Colab notebook to fine-tune a model and bring back inferences from the fine-tuned model for evaluation and diagnosis.
For this step, you will need:
- Your API Key
- Your Model Run ID to export the corresponding ground truth and articles from the model run
Export ground truth from the model run experiment
Labelbox will return the ground truth export in a JSON format. With the provided Colab notebook, we can visualize the exported JSON into a DataFrame format for us to view corresponding ground truth for each article.
Given that we want to fine-tune a Google Vertex model with this data, we’ll need to convert the ground truth export to a GCP vertex tuning format (JSONL):
# build LLM prompt and convert to GCP vertex tuning format (jsonl)

prompt = 'Given the following headline and content, determine whether the article is related to climate change or similar topics. Also determine whether the article contains inaccurate or disinformation. Answer in the following format with Yes/No Answers: [climate related? / disinformation?]'
df['input_text'] = prompt + df['content']
df['output_text'] = 'climate related: ' + df['climate_related'] + ' disinformation: ' + df['disinformation_flag']


with open('modelPrompt_GCP.jsonl', 'w') as file:
for _, row in df[['input_text', 'output_text']].iterrows():
json_line = row.to_json()
file.write(json_line + '\n')
Fine-tune an LLM with Google Vertex AI
Fine-tuning is a technique whereby we take an off-the-shelf open-source or proprietary model and retrain it on a variety of concrete examples, and save the updated weights as a new model checkpoint. You can learn more about other techniques to leverage LLMs in this guide.
For this use case, we’ll be using Google Vertex AI to fine-tune an LLM with the ground truth from Part 1 of this tutorial. Once in the Vertex AI console, we’ll want to create a tuned model:
- Choose a supervised learning task
- Enter additional model parameters (e.g model name)
- Upload the JSONL file from the previous step
Now, we can start the model tuning process. Once the model fine-tuning job has been completed, we can head over to the Google Vertex sandbox and give the newly tuned model a prompt.
For example, we can ask if the article is climate related and if it contains disinformation and it will provide a response based on the training dataset we provided.
Create inferences with the tuned model and evaluate model effectiveness in Labelbox
Now that we’ve fine-tuned a model, we can use it to make predictions on the initial dataset and compare it with our ground truth data to assess the fine-tuned model’s performance.
Create inferences with the tuned model
We’ll need to:
- Install Google Vertex and Google Cloud SDK
- Provide the endpoint ID for the tuned model
We can then start creating model inferences and predictions from the tuned model on our news articles. Use Pandas to clean up the responses, to remove corresponding prompts, and save them as a DataFrame — this will return the model’s initial headline and the client’s response if the data row is climate related or contains disinformation.
Once we have model inferences, we can send the inferences back to a model run in Labelbox for further evaluation and analysis.
Evaluate and diagnose model effectiveness
To evaluate the effectiveness of the fine-tuned model in Labelbox, we’ll need to:
- Specify the model run ID
- Upload the list of model inferences for each specific data row
- Attach each list of data rows and submit it to a model run in Labelbox as an upload job via the SDK
Once that’s complete, you can hop back to the original Labelbox model run and view the corresponding ground truth data and model inferences on each data row. You can visually compare the effectiveness of the fine-tuned model predictions (in red) with ground truth (in green).
- Use the "Metrics view" to drill into crucial model metrics, such as confusion matrix, precision, recall, F1 score, and more, to surface model errors.
- Model metrics are auto-populated and interactive. You can click on any chart or metric to open up the gallery view of the model run and see corresponding examples.
For this use case, our goal is to minimize the spread of disinformation, so we can take a look at the metric that shows corresponding articles that are considered "disinformation" by labelers, but where the model incorrectly predicted articles as "not disinformation".
After running error analysis, you can make more informed decisions on how to iterate and improve your model’s performance with corrective action or targeted data selection.
Curate high-impact data to drastically improve model performance
Once you’ve identified an example of a corner-case where the model might be struggling, you can easily leverage Catalog to surface similar unlabeled examples to improve model performance.
- Select any corner-cases and select "Find similar in Catalog" from the Manage Selection dropdown. This will bring you back into Catalog and will automatically surface all similar data rows (both labeled and unlabeled) to the selected example.
- To only surface unlabeled articles that you can send to your model for labeling, you can filter on the "Annotation is" filter and select "none". This will only show unlabeled text articles that are similar to the selected corner case.
- Select all articles that apply and send them as a batch to your original labeling project. Labeling these in priority will help improve model performance.
With new high-impact data labeled, you can retrain the model and can track model improvements across various runs for comparison and how this has affected model performance.
Unmoderated content poses mounting risks to businesses with the risk of spreading misinformation, disinformation, and an unsafe online environment. With responsible implementation, businesses can leverage AI for trust and safety to efficiently and consistently identify high-risk content at scale. This not only helps create an online environment that is safe for users, but also helps protect brand reputation.
Labelbox is a data-centric AI platform that empowers teams to iteratively build powerful product recommendation engines to fuel lasting customer relationships. To get started, sign up for a free Labelbox account or request a demo.